Description
Full Speed Range Forward Collision Warning Plus
▸Contents: 08 - Electrical
8A - Audio/Video/Entertainment/Connectivity
- Description And Operation
- Technical SpecificationsTorque Specifications
ANTENNA, Bluetooth/WiFi
Media Hub
Removal and Installation
SWITCH, Remote Radio
8B - Chime/Buzzer/Driver Assist
- DISPLAY, Blind SpotRemoval And Installation
MODULE, Park Assist
SENSOR, Blind Spot
SENSOR, Park Assist
Removal and Installation
8C - Power Accessories
Universal Transmitter
- DescriptionUniversal Garage Door Opener
- Diagnosis and TestingHomelink® Transceiver
Standard Procedure
- Erasing Homelink® Transceiver Codes
- Programming Homelink® Transceiver Codes
- Reprogramming Homelink® Transceiver Codes
- Removal And Installation
8E - Electronic Control Modules
- Standard ProcedureImmobilizer Components And Replacement Guide
- Technical SpecificationsTorque Specifications
Amplifier (Amp)
- Description and OperationAmplifier
- Removal and InstallationAmplifier (Amp)
Communication
- DescriptionDescription And Operation
CONNECTOR, Data Link (DLC)
- Description and OperationData Link Connector (Dlc)
CONTROL UNIT, DEF Heater
- Description
- Removal and InstallationDef Heater Control Unit
MODULE, Active Air Dam (AADM)
- DescriptionActive Air Dam (Aad) Module
- Removal and InstallationActive Air Dam Module
MODULE, Active Damping Control (ADCM)
- Description and OperationActive Damping Control Module (Adcm)
- Removal And Installation
MODULE, Active Noise Cancellation (ANC)
- Description and OperationActive Noise Cancellation (Anc) Module
Removal and Installation
- Microphone-Front
- Microphone-Rear
- Active Noise Cancellation Module
MODULE, Active Vibration Cancellation (AVCM)
- Description and OperationActive Vibration Cancellation (Avc)
Removal and Installation
- Actuator
- Module
- Module ProgrammingAvc Programming
MODULE, Adaptive Front Lighting System (AFLS)
- DescriptionAdaptive Front Lighting System (Afls)
- Removal and InstallationAdaptive Front Lighting System Module (Afls)
MODULE, Air Suspension Control (ASCM)
- Description and OperationAir Suspension Control Module (Ascm)
- Removal and InstallationAir Suspension Control Module (Ascm)
MODULE, Anti-Lock Brake System (ABS)
- Description And Operation
- Removal and InstallationAnti-Lock Brake System (Abs) Module
- Module ProgrammingAbs
MODULE, Blind Spot (BSM)
- Description and OperationBlind Spot Monitor (Bsm)
- Removal and InstallationBlind Spot Module (Bsm)
MODULE, Body Control (BCM)
- Description and OperationBody Control Module (Bcm)
- Removal and InstallationBody Control Module (Bcm)
MODULE, Central Vision Processing (CVPM)
- DescriptionDescription And Operation
- Removal and InstallationCentral Vision Processing Module (Cvpm)
- Module ProgrammingCvpm Programming
MODULE, Comfort Rear Seat (CRSM)
- Description and OperationComfort Rear Seat Module (Crsm)
- Removal and InstallationComfort Rear Seat Module (Crsm)
MODULE, Comfort Seat and Wheel (CSWM)
- Description and OperationComfort Seat Wheel Module (Cswm)
Removal and Installation
- Base
- Tungsten
MODULE, Display Screen (DSM)
Description and Operation
- Display Screen Module
- Front Passenger Display Module
Removal and Installation
- 8.4 Inch Display
- 12 Inch Display
- Front Passenger Display Module
MODULE, Door (DDM/PDM)
- Description and OperationDoor Control Modules
- Removal and InstallationDoor Control Module
MODULE, Drivers Assistance System (DASM)
- Description and OperationDrivers Assistance System Module (Dasm)
- Removal and InstallationDriver Assistance System Module (Dasm)
- Module ProgrammingDriver Assistance System Module (Dasm) Calibration
MODULE, Drivetrain Control (DTCM)
- Description and OperationDrivetrain Control Module (Dtcm)
- Removal and InstallationDrivetrain Control Module (Dtcm)
MODULE, Electric Power Steering (EPS)
- Description and OperationElectric Power Steering (Eps) Module
- Removal and InstallationElectronic Power Steering (Eps) Module
MODULE, Electronic Shift (ESM)
- Description and OperationElectronic Shift Module (Esm)
- Removal and InstallationElectronic Shift Module (Esm)
MODULE, Fuel Pump Control
- Description and OperationFuel Pump Control Module
- Removal and InstallationFuel Pump Control Module (Fpcm)
MODULE, Global Telematics Box
- Description and OperationGlobal Telematics Box Module (Tbm2)
Removal and Installation
- Module
- Backup Battery
Module, Hvac
- Description and OperationHvac System
- Removal and InstallationHvac Module
MODULE, Instrument Panel Cluster (IPC)
- Description And Operation
Removal and Installation
- Instrument Panel Cluster
- Mask And Lens
MODULE, Integrated Center Stack (ICSM)
- Description and OperationIntegrated Center Stack (Ics) Module
- Removal and InstallationIntegrated Center Stack Module (Icsm)
MODULE, Integrated Trailer Brake (ITBM)
- Description And Operation
- Diagnosis And Testing
Removal and Installation
- Integrated Trailer Brake Module (Itbm)
- Integrated Trailer Brake Switch (Itbs)
MODULE, Keyless Ignition Node (KIN)
- Description and OperationKeyless Ignition Node (Kin)
- Removal and InstallationKeyless Ignition Node (Kin)
MODULE, Memory Seat (MSM)
- Description and OperationMemory Seat Module (Msm)
Removal and Installation
- Base
- Tungsten
MODULE, Occupant Classification (OCM)
- Description and OperationOccupant Classification Module (Ocm)
- Removal and InstallationOccupant Classification Module (Ocm)
Controller, Occupant Restraint (ORC)
- Description and OperationOccupant Restraint Control (Orc)
- Removal and InstallationOccupant Restraint Controller (Orc)
MODULE, Park Assist (PAM)
- DescriptionDescription And Operation
- Removal and InstallationPark Assist Module
- Module ProgrammingDisable/Enable Park Assist Functionality
MODULE, Power Side Step (PSSM)
- Description and OperationPower Side-Step Module (Pssm)
- Removal and InstallationPower Side Step Module
MODULE, Powertrain Control (PCM)
- Description and OperationPowertrain Control Module (Pcm)
Removal and Installation
- Diesel
- GPEC 2a
- Gpec V
Module Programming
- Pcm Programming
- Tlc Learn Procedure
MODULE, Radio Frequency (RF Hub)
- Description and OperationRadio Frequency Hub (Rf-Hub)
- Removal and InstallationRadio Frequency (Rf Hub) Module
Module Programming
- Key Fob Programming
- Programming The Rf-Hub And Key Fobs
MODULE, Seat Massage (SMM)
- Description and OperationSeat Massage Module
- Removal and InstallationSeat Massage Module
MODULE, Security Gateway (SGW)
- Description and OperationSecurity Gateway (Sgw) Module
- Removal and InstallationSecurity Gateway (Sgw) Module
MODULE, Steering Column Control (SCCM)
- Description and OperationSteering Column Control Module (Sccm)
- Removal and InstallationSteering Column Control Module (Sccm)
MODULE, Trailer CAN Gateway Module (TCGWM)
- DescriptionTrailer Can Gateway Module
- Removal and InstallationTrailer Can Gateway Module (Tgwm)
MODULE, Trailer Interface (TIM)
- DescriptionTrailer Interface Module (Tim)
- Removal and InstallationTrailer Interface Module (Tim)
MODULE, Trailer Reverse Steering Control (TRSCM)
- DescriptionTrailer Reverse Steering Control (Trsc)
- Removal and InstallationTrailer Reverse Steering Control Module (Trscm)
MODULE, Trailer Surround View Camera Module (STIM)
- DescriptionTrailer Surround View Camera Module (Stim)
- Removal and InstallationTrailer Surround View Camera Module (Stim)
MODULE, Trailer Tire Pressure (TTPM)
- DescriptionTrailer Tire Pressure Monitoring (Ttpm)
- Removal and InstallationTrailer Tire Pressure Monitor (Ttpm)
MODULE, Transmission Control (TCM)
- Description and OperationTransmission Control Module (Tcm)
- Removal and InstallationTransmission Control Module
Module Programming
- Programming The Transmission Control Module
- Tcm Adaptation - 850re / 8hp75
Radio
- Description And Operation
Removal and Installation
- Radio With Dsm
- Radio Without Dsm
8F - Engine Systems
Battery System
- Description and OperationLow Voltage Battery System
Diagnosis and Testing
- Diagnosis And Testing - Single Battery 12 Volt System
- Open Circuit Voltage Test
Technical Specifications
- Battery
- Torque Specifications - Battery System
Standard Procedure
- Ignition Off Draw Test - Gas/Diesel
- 12 Volt Battery Charging
- BATTERY DISCONNECT AND CONNECT - eTORQUE SYSTEM
Battery
- Removal and InstallationBattery
SENSOR, Intelligent Battery (IBS)
- Removal and InstallationIntelligent Battery Sensor (Ibs)
TRAY, Battery
- Removal and InstallationBattery Tray - Except 6.2l
Starting
Description and Operation
- Standard Starting
- Remote Start System
- Diagnosis and TestingStandard Starting System
- Technical SpecificationsTorque Specifications
ANTENNA, Remote Start
- Removal and InstallationRemote Start Antenna (Rsa)
BUTTON, Start/Stop
- Removal and InstallationStart/Stop Button
Starter
- Removal and InstallationStarter Motor
8G - Heated/Cooled Systems
Heated/Cooled Accessories
- Description And Operation
Diagnosis and Testing
- Heated Steering Wheel
- Ventilated Seats
MOTOR, Vented Front Seat Back
Removal and Installation
- Vented Front Seat Back Motor
- Vented Front Seat Cushion Motor
- Vented Rear Seat Back Motor 40%
- Vented Rear Seat Back Motor 60%
- Vented Rear Seat Cushion Motor 40%
- Vented Rear Seat Cushion Motor 60%
PAD, Vented Front Seat Back
Removal and Installation
- Vented Front Seat Back Pad
- Vented Front Seat Cushion Pad
- Vented Rear Seat Back Pad 40%
- Vented Rear Seat Back Pad 60%
- Vented Rear Seat Cushion Pad 40%
- Vented Rear Seat Cushion Pad 60%
SWITCH, Heated Steering Wheel
- Removal and InstallationHeated Steering Wheel Switch
SWITCH, Vented Seat
Removal and Installation
- Removal And Installation
- Vented Rear Seat Switch
WHEEL, Heated Steering
- Removal and InstallationHeated Steering Wheel
Heated Glass
- Description And Operation
- Diagnosis and TestingDiagnosis And Testing - Electric Backlight (Ebl) And Heated Mirror System
GRID, Defogger
- Standard ProcedureStandard Procedure - Grid Line And Terminal Repair
- Heated MirrorsDescription And Operation
Heated Seats
- Description And Operation
- Diagnosis and TestingDiagnosis And Testing - Heated Seat System
PAD, Heater
Removal and Installation
- Base
- Tungsten
- Base
- Tungsten
- Heater Rear Seat Back Pad
- Heater Rear Seat Cushion Pad
SWITCH, Heated Seat
Removal and Installation
- Front Seat Switch
- In Center Seat
- In Floor Console
8H - Horn
- Description And Operation
- Diagnosis and TestingDiagnosis And Testing - Horn System
- Technical SpecificationsTorque Specifications
Horn
- Diagnosis and TestingDiagnosis And Testing - Horn
- Removal and InstallationHorn
SWITCH, Horn
- Diagnosis and TestingDiagnosis And Testing - Horn Switch
- Removal And Installation
8J - Instrument Cluster
- Description and OperationInstrument Cluster And Switches
- Diagnosis and TestingInstrument Panel Cluster
- Standard ProcedureEnhanced Seatbelt Reminder Programming
Removal and Installation
- Instrument Panel Cluster
- Mask And Lens
DISPLAY, Heads Up
- Removal and InstallationHeads Up Display
MODULE, Trailer Reverse Steering Knob (TRSKM)
- Removal and InstallationTrailer Reverse Steering Knob Module (Trskm)
POD, Switch Bank
- Removal and InstallationSwitch Bank Pod
SWITCH, EVIC Control
- Removal and InstallationEvic Switch
8L - Lamps and Lighting
Lamps/Lighting - Exterior
- Description and OperationExterior Lamps And Lighting
- Diagnosis and TestingExterior Lamps And Lighting
- Standard ProcedureFront Lamp Aiming
- Technical SpecificationsTorque Specifications
Lamp
- Removal and InstallationTrailer Hitch Lamp
LAMP, Cargo
- Removal and InstallationCargo Lamp
LAMP, Center High Mounted Stop
Removal and Installation
- Bulb
- Center High Mounted Stop Lamp (Chmsl)
LAMP, Fog
Removal and Installation
- Bulb
- Lamp - Bulb
- Front Fog Lamp
- Lamp - Rebel/Trx
- Lamp - Tungsten
LAMP, License Plate
- Removal and InstallationLicense Plate Lamp
LAMP, Mirror
Removal and Installation
- Puddle Lamp
- Puddle Lamp Power Telescoping
- Puddle Lamp Tow Mirror Without Surround View
- Puddle Lamp Tow Mirror With Surround View
- Signal Lamp
- Signal Lamp Power Telescoping
- Signal Lamp Tow Mirror
- Signature Lamp Power Telescoping
- Spotter Lamp Power Telescoping
- Spotter Lamp Trailer Towing
LAMP, Park and Turn Signal
- Removal and InstallationPark And Turn Signal Lamp
LAMP, Ram Box
- Removal and InstallationRam Box Lamp
LAMP, Identification
Removal and Installation
- Front
- Rear
LAMP, Side Marker, Front
- Removal and InstallationFront Side Marker Lamp
LAMP, Side Marker, Rear
- Removal and InstallationRear Side Marker Lamp
LAMP, Tail Stop Turn
Removal and Installation
- Bulb
- Tail Lamp Assembly
SENSOR, Stop Lamp
- Removal and InstallationStop Lamp Sensor
SWITCH, Headlamp
- Removal and InstallationHeadlamp Switch
- SWITCH, MultifunctionRemoval And Installation
UNIT, Front Lamp
- Standard ProcedureLamp Lens Defogging
Removal and Installation
- Headlamp Unit
- Headlamp Bulbs
Lamps/Lighting - Interior
- Description And Operation
- Diagnosis and TestingDiagnosis And Testing - Interior Lighting
LAMP, Courtesy
Removal and Installation
- Cupholder Overhead
- Console Lid
- Door Handle
- Door Map
- Door Mid Bin
- Footwell
- Instrument Panel
- Seat
LAMP, Glove Box
- Removal and InstallationLamp/Switch
LAMP, Dome
- Removal and InstallationDome Lamp
8N - Power Systems
Power Locks
- Description And Operation
- Diagnosis and TestingPower Locks
ANTENNA, Passive Entry
Removal and Installation
- Passive Entry Antenna - Center Cab
- Rear Cab
- Rear Door
- Rear Box
SWITCH, Lock
- Removal and InstallationLock Switch
- SWITCH, Tailgate ReleaseRemoval And Installation
TRANSMITTER, Integrated Key FOB
Diagnosis and Testing
- Keyfob Transmitter Battery
- Keyfob Transmitter
- Standard ProcedureKey Fob Programming
Power Mirrors
Description and Operation
- Exterior Power Mirrors
- Interior Power Mirrors
- MIRROR, Automatic Day and NightRemoval And Installation
MIRROR, Outside Rearview
- Removal and InstallationOutside Rearview Mirror
SWITCH, Mirror
- Diagnosis and TestingPower Mirror Switch
- Removal And Installation
Power Seats
Description and Operation
- Power Seats
- Memory Seats
- Diagnosis and TestingPower Seat System
MOTOR, Lumbar
- Removal and InstallationLumbar Motor
MOTOR, Seat
Removal and Installation
- Power Seat Motor
- Tungsten - Seat Cushion Extension
- Tungsten - Seat Fore-Aft
- Tungsten - Seat Tilt
- Tungsten - Seat Up-Down
SWITCH, Lumbar Control
- Removal and InstallationLumbar Control Switch
SWITCH, Memory
- Removal and InstallationMemory Switch
SWITCH, Seat, Power
Removal and Installation
- Base
- Tungsten
Power Side Step
- DescriptionPower Side Step
- Diagnosis and TestingDiagnosis And Testing - Power Side Steps
MOTOR, Power Side Step
- Removal and InstallationPower Side Step Motor
Power Tailgate
MODULE, Tailgate Control
- Removal and InstallationTailgate Control Module
Power Top, Sunroof
- Description And Operation
Diagnosis and Testing
- Diagnosis And Testing - Single Pane Power Sunroof System
- Diagnosis And Testing - Dual Pane Power Sunroof System
- Technical SpecificationsTorque Specifications
MOTOR, Sunroof
Standard Procedure
- Dual Pane Sunroof Calibrations
- Single Pane Sunroof Calibrations
- Sunroof Or Sunshade Obstacle Detection Override
Removal and Installation
- Dual Pane Motor
- Single Pane Motor
MOTOR, Sunroof Shade, Dual Pane
- Removal and InstallationDual Pane Sunroof Shade Motor
- SWITCH, SunroofRemoval And Installation
Power Windows
- Description and OperationPower Windows
- Diagnosis and TestingPower Windows
MOTOR, Window Regulator
- Removal and InstallationWindow Regulator Motor
SWITCH, Power Window
- Diagnosis and TestingDiagnosis And Testing - Power Window Switches
- Removal and InstallationPower Window Switch
8P - Speed Control
Description and Operation
- Conventional Cruise Control
- Adaptive Cruise Control With Stop And Go
SWITCH, Speed Control
- Removal and InstallationSpeed Control Switch
8Q - Vehicle Theft Security
Description and Operation
- Sentry Key Immobilizer System
- Vehicle Theft Alarm
- Diagnosis and TestingKey Fob Testing
SWITCH, Hood Ajar
- Diagnosis and TestingDiagnosis And Testing - Hood Ajar Switch
- Removal and InstallationHood Ajar Switch
8R - Wipers/Washers
- Description And Operation
- Diagnosis and TestingFront Wiper System
- Technical SpecificationsTorque Specifications
Cleaning
- Washer System Cleaning
- Wiper System Cleaning
Inspection
- Washer System Inspection
- Wiper System Inspection
ARM, Wiper
- Removal and InstallationWiper Arm
BLADE, Wiper
- Removal and InstallationWiper Blade
LINKAGE, Wiper Arm
- Removal and InstallationWiper Arm Linkage
MODULE, Humidity Rain Light Sensor
Standard Procedure
- Protective Cap Removal
- Silicone Gelatin Pad Replacement
- Removal and InstallationHumidity Rain Light Sensor Module (Hrlsm)
MOTOR, Wiper
- Removal and InstallationWiper Motor
NOZZLE, Washer
Removal and Installation
- Washer Nozzle
- Trx Washer Nozzle
PUMP, Windshield Washer
- Removal and InstallationWindshield Washer Pump
RESERVOIR, Windshield Washer
- Removal and InstallationWindshield Washer Reservoir
SWITCH, Multifunction, Left
- Removal and InstallationLeft Multifunction Switch
SWITCH, Washer Fluid Level
- Removal and InstallationWasher Fluid Level Switch
8T - Navigation/Telecommunication
Description and Operation
- Hands Free Phone
- Navigation
- Uconnect + Siriusxm Guardian
Diagnosis and Testing
- Diagnosis And Testing - Hands Free Phone
- Diagnosis And Testing - Navigation
- Diagnosis And Testing - Uconnect + Siriusxm Guardian
Standard Procedure
- Navigation System - Restore Or Update
- Uconnect + Siriusxm Guardian System - Reinstall Applications
- Uconnect® + Siriusxm® Guardian™ System - Remove Accounts
ANTENNA, Long-Term Evolution 2 (LTE2)
- Diagnosis and TestingDiagnosis And Testing - Cellular Antenna
- Removal and InstallationLong Term Evolution 2 (Lte2) Antenna
ANTENNA, Navigation
- Diagnosis and TestingDiagnosis And Testing - Navigation Antenna
- Removal and InstallationNavigation Antenna
Microphone
- Diagnosis and TestingDiagnosis And Testing - Microphone
- Removal and InstallationMicrophone
8W - Power Distribution
- Description And Operation
- Diagnosis and TestingWireless Charging Pad Module
- Technical SpecificationsTorque Specifications
CENTER, Power Distribution (PDC)
Removal and Installation
- Power Distribution Center - Front
- Power Distribution Center - Interior
MODULE, Power Inverter
- Removal and InstallationPower Inverter Module (Pim)
MODULE, Wireless Charging Pad
Removal and Installation
- Wireless Charging Pad Module
- Wireless Charging Pad Module-Trx
OUTLET, Power
- Diagnosis and TestingDiagnosis And Testing - 115 V Power Outlet
Removal and Installation
- 12 Volt Outlet – Instrument Panel
- 115 Volt Outlet – Front
- 115 Volt Outlet – Ram Box
- 115 Volt Outlet - Rear
- Switch – Rambox 115 Volt Outlet
- Usb Charge Port - Console Lid
- Usb Charge Port - Rear Console
DESCRIPTION
| NOTE: |
The Forward Collision Warning (FCW) system alerts and assists the driver to help avoid or mitigate a collision. If the driver does not respond to any of the audible, visual, and haptic warnings, the impact may not be avoided. |
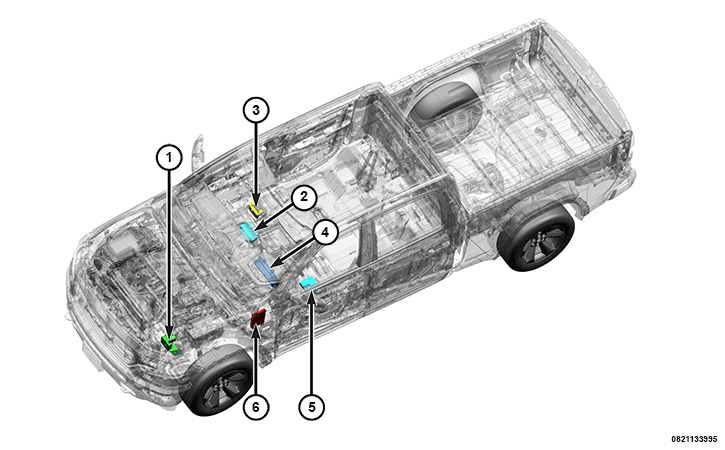 |
Component Index
|
1. |
|
|
2. |
|
|
3. |
|
|
4. |
|
|
5. |
|
|
6. |
- The FCW system uses a forward looking radar to determine the range and speed of the vehicles and objects in the forward path of the host vehicle and a camera to perform object classification and to determine road lane markings which are integrated into the DASM Electronic Control Unit (ECU).
- The DASM uses the radar and camera fusion data to determine probable collisions with vehicles and objects in the forward path of the host vehicle.
- Based on the sensor fusion algorithm and vehicle dynamic data, the DASM determines a Time To Collision (TTC) between the host vehicle and any target vehicles or objects in its forward path.
- When the TTC becomes too small the FCW system provides the driver with audible and visual warning, brake prefill, a haptic warning in the form of a brake jerk, limited autonomous braking and Advanced Brake Assist (ABA) to attempt to alert the driver and to mitigate a potential frontal collision.
- At low vehicle speeds, in addition to the above mentioned functionality, the FCW system provides full autonomous braking in an attempt to mitigate a frontal collision.
The FCW system uses three levels of warnings:
- A visual warning displayed in the IPC
- An audible warning generated by the radio or amplifier system
- A haptic warning in the form of a brake jerk. A brake jerk is a brake pulse or a momentary application of the brakes
The FCW system has six customer configurational settings:
The FCW system is disabled and enabled via a soft switch located in the radio settings in the safety and driver assistance menu. When the system is disabled by the user or if the system is disabled due to a fault, the FCW OFF icon will be displayed in the IPC.
OPERATION
- The FCW system is only active when the status of the ignition position is ON, the transmission is in D rive and wheel speed sensors indicate that the vehicle is moving in a forward direction.
- The system can be manually disabled and enabled by the vehicle operator using the soft switch in the radio. The default status of FCW is ON. The system state is kept in memory from one key cycle to the next. If the system is turned OFF, it will remain OFF when the vehicle is restarted. The minimum speed for FCW activation is 3 mph (5 km/h).
- The FCW+ system uses the forward looking DASM to determine the range and speed of the vehicle(s) and objects in the forward path of the host vehicle.
- The FCW+ system uses the DASM to perform object classification and to determine lane markings.
- The FCW+ system uses a sensor fusion algorithm to combine the information detected from the object detection and the lane markings to determine probable collisions with vehicles and objects in the forward path of the host vehicle. The internal camera provides the DASM with object information, lane information and the camera status. The sensor fusion algorithm and logic is contained within the DASM.
- Based on the sensor fusion algorithm and vehicle dynamic data the FCW+ System determines a TTC between the host vehicle and any target vehicles or objects in its forward path.
- The system will react on moving objects. A target is considered a moving object if it has a velocity greater than zero while the system is tracking it.
- The system will react on stopped objects. A target is considered a stopped object if it has a velocity greater than zero, then comes to a stop while the system is tracking it.
- The system will react on stationary objects. A target is considered a stationary object if it has zero velocity the entire time the system is tracking it.
- When the TTC becomes too small the FCW system issues visual, audible and haptic warning(s) to alert the driver of a probable collision.
- The first warning provided by the system will be a combined audible/visual warning to the driver. This audible/visual warning may be activated at the same time the brake prefill is performed.
- After the first warning, if the driver has not responded and the collision is still probable, the system provides a second warning. The second warning is a haptic warning in the form of a brake jerk. The DASM will request a brake jerk by transmitting a request to the ABS module. The ABS module will respond and execute the brake jerk request. The audible/visual warnings will be active during the brake jerk warning.
- After the brake jerk, if the driver still has not responded and the collision is still probable the system will activate autonomous braking. The autonomous braking will be activated. The DASM makes the deceleration requests for autonomous braking by transmitting the signals to the ABS module. The ABS module will respond to the deceleration request for autonomous braking. The audible and visual warnings will be active during the autonomous braking.
- If an ABS event is active, the DASM will continuously send an autonomous brake request while the ABS event is active. Under this condition, the ABS module will honor the autonomous brake request based on the arbitration strategy defined for multiple requests to the ABS system. Autonomous braking may be requested after, at the same time as, or without a brake jerk request, and the request must be honored by the ABS in this condition.
BRAKE PREFILL OPERATION
- Under normal circumstances, there is space between the pads and rotors to prevent the pads from wearing out prematurely. This space between the pads and rotors increases the response time during any situation which may require emergency braking. The brake prefill prepares the system for braking by moving the pads closer to the rotor to improve braking response time.
- The brake prefill is performed by the ABS module.
- The DASM controls the activation and deactivation of the brake prefill.
- The brake prefill should cause no audible brake noise.
- The brake prefill should cause no vehicle deceleration.
- The brake lights will not be activated during a brake prefill.
ADVANCED BRAKE ASSIST OPERATION
- The ABA feature of FCW will provide additional braking during an emergency braking event if the driver provides insufficient braking for the situation.
- The DASM will make deceleration requests for the advanced brake assist feature by transmitting request signals to the ABS module.
- ABA will be aborted when the driver completely releases the brake pedal.
- If an ABS event is active, the DASM will continuously send an ABA request while the ABS event is active. Under this condition, the ABS module will honor the ABA request based on the arbitration strategy defined for multiple requests to the ABS system.
AUTONOMOUS BRAKE REQUEST OPERATION
- After the brake jerk, if the driver still has not responded and the collision is still probable the system will activate autonomous braking.
- The DASM will make the deceleration requests for autonomous braking by transmitting the signals to the ABS module.
- The ABS system will send a Controller Area Network-Chassis (CAN-C) bus request to the BCM to activate the brake lights.
Since there are multiple modules involved in the operation of the FCW system, all faults or diagnostic trouble codes should be checked during diagnosis. The DASMs integrated radar requires proper alignment. Any alignment or configuration issues may cause the system to be inoperative. If the DASM detects incorrect or compromised information, the FCW will function in a limited capacity.
Amplifier (AMP) if equipped or Radio
Used to provide auditory warning chimes to the cabin of the vehicle. The DASM controls the warning logic and used the BCM to provide a gated message request to the Radio or AMP.
Anti-lock Brake System (ABS) Module
The ABS module provides a variety of vehicle dynamic inputs to the DASM. The DASM uses these inputs to manage the FCW strategy. The DASM will output braking requests to the ABS module for autonomous braking and brake prefill.
Body Control Module (BCM)
The BCM is the gateway for the BUS communication systems. The BCM is also responsible for providing vehicle specific configuration parameters to multiple nodes on the BUS, battery voltage and commanded ignition state signals to the DASM. The BCM receives input signals from the DASM that it gates to the IPC for warning display messages and, under specific conditions, to the Radio or AMP to provide audible chime warnings.
Display Screen Module (DSM)
The DSM provides an interface for the vehicle operator to modify the customer programmable options.
Driver Assistance System Module (DASM)
The DASM uses an integral radar and camera, by means of data fusion, to detect vehicles in the forward path of the vehicle that are moving, stopped or stationary and lane markings on the road. The DASM considers an object moving if it has a velocity greater than zero while being tracked. The DASM considers an object stopped it has a velocity greater than zero and then comes to a stop. The DASM will consider an object stationary if it has zero velocity the entire time that it is being tracked.
The DASM controls the activation and deactivation of the visual and audible warning in the IPC. The DASM commanded audible warning used by the FCW system is generated by the radio or amplifier system. All warning signals, visual or auditory, are transmitted to the BCM over the CAN-C bus to be gated to CAN-Interior High Speed (CAN-IHS) and forwarded to the IPC, Radio or AMP.
Instrument Panel Cluster (IPC)
The IPC receives vehicle specific configuration data and warning message requests gated from the BCM. The command for the warning messages originate with the DASM.