Description
Surround View Camera System
▸Contents: 08 - Electrical
8A - Audio/Video/Entertainment/Connectivity
- Description And Operation
- Technical SpecificationsTorque Specifications
ANTENNA, Bluetooth/WiFi
Media Hub
Removal and Installation
SWITCH, Remote Radio
8B - Chime/Buzzer/Driver Assist
- DISPLAY, Blind SpotRemoval And Installation
MODULE, Park Assist
SENSOR, Blind Spot
SENSOR, Park Assist
Removal and Installation
8C - Power Accessories
Universal Transmitter
- DescriptionUniversal Garage Door Opener
- Diagnosis and TestingHomelink® Transceiver
Standard Procedure
- Erasing Homelink® Transceiver Codes
- Programming Homelink® Transceiver Codes
- Reprogramming Homelink® Transceiver Codes
- Removal And Installation
8E - Electronic Control Modules
- Standard ProcedureImmobilizer Components And Replacement Guide
- Technical SpecificationsTorque Specifications
Amplifier (Amp)
- Description and OperationAmplifier
- Removal and InstallationAmplifier (Amp)
Communication
- DescriptionDescription And Operation
CONNECTOR, Data Link (DLC)
- Description and OperationData Link Connector (Dlc)
CONTROL UNIT, DEF Heater
- Description
- Removal and InstallationDef Heater Control Unit
MODULE, Active Air Dam (AADM)
- DescriptionActive Air Dam (Aad) Module
- Removal and InstallationActive Air Dam Module
MODULE, Active Damping Control (ADCM)
- Description and OperationActive Damping Control Module (Adcm)
- Removal And Installation
MODULE, Active Noise Cancellation (ANC)
- Description and OperationActive Noise Cancellation (Anc) Module
Removal and Installation
- Microphone-Front
- Microphone-Rear
- Active Noise Cancellation Module
MODULE, Active Vibration Cancellation (AVCM)
- Description and OperationActive Vibration Cancellation (Avc)
Removal and Installation
- Actuator
- Module
- Module ProgrammingAvc Programming
MODULE, Adaptive Front Lighting System (AFLS)
- DescriptionAdaptive Front Lighting System (Afls)
- Removal and InstallationAdaptive Front Lighting System Module (Afls)
MODULE, Air Suspension Control (ASCM)
- Description and OperationAir Suspension Control Module (Ascm)
- Removal and InstallationAir Suspension Control Module (Ascm)
MODULE, Anti-Lock Brake System (ABS)
- Description And Operation
- Removal and InstallationAnti-Lock Brake System (Abs) Module
- Module ProgrammingAbs
MODULE, Blind Spot (BSM)
- Description and OperationBlind Spot Monitor (Bsm)
- Removal and InstallationBlind Spot Module (Bsm)
MODULE, Body Control (BCM)
- Description and OperationBody Control Module (Bcm)
- Removal and InstallationBody Control Module (Bcm)
MODULE, Central Vision Processing (CVPM)
- DescriptionDescription And Operation
- Removal and InstallationCentral Vision Processing Module (Cvpm)
- Module ProgrammingCvpm Programming
MODULE, Comfort Rear Seat (CRSM)
- Description and OperationComfort Rear Seat Module (Crsm)
- Removal and InstallationComfort Rear Seat Module (Crsm)
MODULE, Comfort Seat and Wheel (CSWM)
- Description and OperationComfort Seat Wheel Module (Cswm)
Removal and Installation
- Base
- Tungsten
MODULE, Display Screen (DSM)
Description and Operation
- Display Screen Module
- Front Passenger Display Module
Removal and Installation
- 8.4 Inch Display
- 12 Inch Display
- Front Passenger Display Module
MODULE, Door (DDM/PDM)
- Description and OperationDoor Control Modules
- Removal and InstallationDoor Control Module
MODULE, Drivers Assistance System (DASM)
- Description and OperationDrivers Assistance System Module (Dasm)
- Removal and InstallationDriver Assistance System Module (Dasm)
- Module ProgrammingDriver Assistance System Module (Dasm) Calibration
MODULE, Drivetrain Control (DTCM)
- Description and OperationDrivetrain Control Module (Dtcm)
- Removal and InstallationDrivetrain Control Module (Dtcm)
MODULE, Electric Power Steering (EPS)
- Description and OperationElectric Power Steering (Eps) Module
- Removal and InstallationElectronic Power Steering (Eps) Module
MODULE, Electronic Shift (ESM)
- Description and OperationElectronic Shift Module (Esm)
- Removal and InstallationElectronic Shift Module (Esm)
MODULE, Fuel Pump Control
- Description and OperationFuel Pump Control Module
- Removal and InstallationFuel Pump Control Module (Fpcm)
MODULE, Global Telematics Box
- Description and OperationGlobal Telematics Box Module (Tbm2)
Removal and Installation
- Module
- Backup Battery
Module, Hvac
- Description and OperationHvac System
- Removal and InstallationHvac Module
MODULE, Instrument Panel Cluster (IPC)
- Description And Operation
Removal and Installation
- Instrument Panel Cluster
- Mask And Lens
MODULE, Integrated Center Stack (ICSM)
- Description and OperationIntegrated Center Stack (Ics) Module
- Removal and InstallationIntegrated Center Stack Module (Icsm)
MODULE, Integrated Trailer Brake (ITBM)
- Description And Operation
- Diagnosis And Testing
Removal and Installation
- Integrated Trailer Brake Module (Itbm)
- Integrated Trailer Brake Switch (Itbs)
MODULE, Keyless Ignition Node (KIN)
- Description and OperationKeyless Ignition Node (Kin)
- Removal and InstallationKeyless Ignition Node (Kin)
MODULE, Memory Seat (MSM)
- Description and OperationMemory Seat Module (Msm)
Removal and Installation
- Base
- Tungsten
MODULE, Occupant Classification (OCM)
- Description and OperationOccupant Classification Module (Ocm)
- Removal and InstallationOccupant Classification Module (Ocm)
Controller, Occupant Restraint (ORC)
- Description and OperationOccupant Restraint Control (Orc)
- Removal and InstallationOccupant Restraint Controller (Orc)
MODULE, Park Assist (PAM)
- DescriptionDescription And Operation
- Removal and InstallationPark Assist Module
- Module ProgrammingDisable/Enable Park Assist Functionality
MODULE, Power Side Step (PSSM)
- Description and OperationPower Side-Step Module (Pssm)
- Removal and InstallationPower Side Step Module
MODULE, Powertrain Control (PCM)
- Description and OperationPowertrain Control Module (Pcm)
Removal and Installation
- Diesel
- GPEC 2a
- Gpec V
Module Programming
- Pcm Programming
- Tlc Learn Procedure
MODULE, Radio Frequency (RF Hub)
- Description and OperationRadio Frequency Hub (Rf-Hub)
- Removal and InstallationRadio Frequency (Rf Hub) Module
Module Programming
- Key Fob Programming
- Programming The Rf-Hub And Key Fobs
MODULE, Seat Massage (SMM)
- Description and OperationSeat Massage Module
- Removal and InstallationSeat Massage Module
MODULE, Security Gateway (SGW)
- Description and OperationSecurity Gateway (Sgw) Module
- Removal and InstallationSecurity Gateway (Sgw) Module
MODULE, Steering Column Control (SCCM)
- Description and OperationSteering Column Control Module (Sccm)
- Removal and InstallationSteering Column Control Module (Sccm)
MODULE, Trailer CAN Gateway Module (TCGWM)
- DescriptionTrailer Can Gateway Module
- Removal and InstallationTrailer Can Gateway Module (Tgwm)
MODULE, Trailer Interface (TIM)
- DescriptionTrailer Interface Module (Tim)
- Removal and InstallationTrailer Interface Module (Tim)
MODULE, Trailer Reverse Steering Control (TRSCM)
- DescriptionTrailer Reverse Steering Control (Trsc)
- Removal and InstallationTrailer Reverse Steering Control Module (Trscm)
MODULE, Trailer Surround View Camera Module (STIM)
- DescriptionTrailer Surround View Camera Module (Stim)
- Removal and InstallationTrailer Surround View Camera Module (Stim)
MODULE, Trailer Tire Pressure (TTPM)
- DescriptionTrailer Tire Pressure Monitoring (Ttpm)
- Removal and InstallationTrailer Tire Pressure Monitor (Ttpm)
MODULE, Transmission Control (TCM)
- Description and OperationTransmission Control Module (Tcm)
- Removal and InstallationTransmission Control Module
Module Programming
- Programming The Transmission Control Module
- Tcm Adaptation - 850re / 8hp75
Radio
- Description And Operation
Removal and Installation
- Radio With Dsm
- Radio Without Dsm
8F - Engine Systems
Battery System
- Description and OperationLow Voltage Battery System
Diagnosis and Testing
- Diagnosis And Testing - Single Battery 12 Volt System
- Open Circuit Voltage Test
Technical Specifications
- Battery
- Torque Specifications - Battery System
Standard Procedure
- Ignition Off Draw Test - Gas/Diesel
- 12 Volt Battery Charging
- BATTERY DISCONNECT AND CONNECT - eTORQUE SYSTEM
Battery
- Removal and InstallationBattery
SENSOR, Intelligent Battery (IBS)
- Removal and InstallationIntelligent Battery Sensor (Ibs)
TRAY, Battery
- Removal and InstallationBattery Tray - Except 6.2l
Starting
Description and Operation
- Standard Starting
- Remote Start System
- Diagnosis and TestingStandard Starting System
- Technical SpecificationsTorque Specifications
ANTENNA, Remote Start
- Removal and InstallationRemote Start Antenna (Rsa)
BUTTON, Start/Stop
- Removal and InstallationStart/Stop Button
Starter
- Removal and InstallationStarter Motor
8G - Heated/Cooled Systems
Heated/Cooled Accessories
- Description And Operation
Diagnosis and Testing
- Heated Steering Wheel
- Ventilated Seats
MOTOR, Vented Front Seat Back
Removal and Installation
- Vented Front Seat Back Motor
- Vented Front Seat Cushion Motor
- Vented Rear Seat Back Motor 40%
- Vented Rear Seat Back Motor 60%
- Vented Rear Seat Cushion Motor 40%
- Vented Rear Seat Cushion Motor 60%
PAD, Vented Front Seat Back
Removal and Installation
- Vented Front Seat Back Pad
- Vented Front Seat Cushion Pad
- Vented Rear Seat Back Pad 40%
- Vented Rear Seat Back Pad 60%
- Vented Rear Seat Cushion Pad 40%
- Vented Rear Seat Cushion Pad 60%
SWITCH, Heated Steering Wheel
- Removal and InstallationHeated Steering Wheel Switch
SWITCH, Vented Seat
Removal and Installation
- Removal And Installation
- Vented Rear Seat Switch
WHEEL, Heated Steering
- Removal and InstallationHeated Steering Wheel
Heated Glass
- Description And Operation
- Diagnosis and TestingDiagnosis And Testing - Electric Backlight (Ebl) And Heated Mirror System
GRID, Defogger
- Standard ProcedureStandard Procedure - Grid Line And Terminal Repair
- Heated MirrorsDescription And Operation
Heated Seats
- Description And Operation
- Diagnosis and TestingDiagnosis And Testing - Heated Seat System
PAD, Heater
Removal and Installation
- Base
- Tungsten
- Base
- Tungsten
- Heater Rear Seat Back Pad
- Heater Rear Seat Cushion Pad
SWITCH, Heated Seat
Removal and Installation
- Front Seat Switch
- In Center Seat
- In Floor Console
8H - Horn
- Description And Operation
- Diagnosis and TestingDiagnosis And Testing - Horn System
- Technical SpecificationsTorque Specifications
Horn
- Diagnosis and TestingDiagnosis And Testing - Horn
- Removal and InstallationHorn
SWITCH, Horn
- Diagnosis and TestingDiagnosis And Testing - Horn Switch
- Removal And Installation
8J - Instrument Cluster
- Description and OperationInstrument Cluster And Switches
- Diagnosis and TestingInstrument Panel Cluster
- Standard ProcedureEnhanced Seatbelt Reminder Programming
Removal and Installation
- Instrument Panel Cluster
- Mask And Lens
DISPLAY, Heads Up
- Removal and InstallationHeads Up Display
MODULE, Trailer Reverse Steering Knob (TRSKM)
- Removal and InstallationTrailer Reverse Steering Knob Module (Trskm)
POD, Switch Bank
- Removal and InstallationSwitch Bank Pod
SWITCH, EVIC Control
- Removal and InstallationEvic Switch
8L - Lamps and Lighting
Lamps/Lighting - Exterior
- Description and OperationExterior Lamps And Lighting
- Diagnosis and TestingExterior Lamps And Lighting
- Standard ProcedureFront Lamp Aiming
- Technical SpecificationsTorque Specifications
Lamp
- Removal and InstallationTrailer Hitch Lamp
LAMP, Cargo
- Removal and InstallationCargo Lamp
LAMP, Center High Mounted Stop
Removal and Installation
- Bulb
- Center High Mounted Stop Lamp (Chmsl)
LAMP, Fog
Removal and Installation
- Bulb
- Lamp - Bulb
- Front Fog Lamp
- Lamp - Rebel/Trx
- Lamp - Tungsten
LAMP, License Plate
- Removal and InstallationLicense Plate Lamp
LAMP, Mirror
Removal and Installation
- Puddle Lamp
- Puddle Lamp Power Telescoping
- Puddle Lamp Tow Mirror Without Surround View
- Puddle Lamp Tow Mirror With Surround View
- Signal Lamp
- Signal Lamp Power Telescoping
- Signal Lamp Tow Mirror
- Signature Lamp Power Telescoping
- Spotter Lamp Power Telescoping
- Spotter Lamp Trailer Towing
LAMP, Park and Turn Signal
- Removal and InstallationPark And Turn Signal Lamp
LAMP, Ram Box
- Removal and InstallationRam Box Lamp
LAMP, Identification
Removal and Installation
- Front
- Rear
LAMP, Side Marker, Front
- Removal and InstallationFront Side Marker Lamp
LAMP, Side Marker, Rear
- Removal and InstallationRear Side Marker Lamp
LAMP, Tail Stop Turn
Removal and Installation
- Bulb
- Tail Lamp Assembly
SENSOR, Stop Lamp
- Removal and InstallationStop Lamp Sensor
SWITCH, Headlamp
- Removal and InstallationHeadlamp Switch
- SWITCH, MultifunctionRemoval And Installation
UNIT, Front Lamp
- Standard ProcedureLamp Lens Defogging
Removal and Installation
- Headlamp Unit
- Headlamp Bulbs
Lamps/Lighting - Interior
- Description And Operation
- Diagnosis and TestingDiagnosis And Testing - Interior Lighting
LAMP, Courtesy
Removal and Installation
- Cupholder Overhead
- Console Lid
- Door Handle
- Door Map
- Door Mid Bin
- Footwell
- Instrument Panel
- Seat
LAMP, Glove Box
- Removal and InstallationLamp/Switch
LAMP, Dome
- Removal and InstallationDome Lamp
8N - Power Systems
Power Locks
- Description And Operation
- Diagnosis and TestingPower Locks
ANTENNA, Passive Entry
Removal and Installation
- Passive Entry Antenna - Center Cab
- Rear Cab
- Rear Door
- Rear Box
SWITCH, Lock
- Removal and InstallationLock Switch
- SWITCH, Tailgate ReleaseRemoval And Installation
TRANSMITTER, Integrated Key FOB
Diagnosis and Testing
- Keyfob Transmitter Battery
- Keyfob Transmitter
- Standard ProcedureKey Fob Programming
Power Mirrors
Description and Operation
- Exterior Power Mirrors
- Interior Power Mirrors
- MIRROR, Automatic Day and NightRemoval And Installation
MIRROR, Outside Rearview
- Removal and InstallationOutside Rearview Mirror
SWITCH, Mirror
- Diagnosis and TestingPower Mirror Switch
- Removal And Installation
Power Seats
Description and Operation
- Power Seats
- Memory Seats
- Diagnosis and TestingPower Seat System
MOTOR, Lumbar
- Removal and InstallationLumbar Motor
MOTOR, Seat
Removal and Installation
- Power Seat Motor
- Tungsten - Seat Cushion Extension
- Tungsten - Seat Fore-Aft
- Tungsten - Seat Tilt
- Tungsten - Seat Up-Down
SWITCH, Lumbar Control
- Removal and InstallationLumbar Control Switch
SWITCH, Memory
- Removal and InstallationMemory Switch
SWITCH, Seat, Power
Removal and Installation
- Base
- Tungsten
Power Side Step
- DescriptionPower Side Step
- Diagnosis and TestingDiagnosis And Testing - Power Side Steps
MOTOR, Power Side Step
- Removal and InstallationPower Side Step Motor
Power Tailgate
MODULE, Tailgate Control
- Removal and InstallationTailgate Control Module
Power Top, Sunroof
- Description And Operation
Diagnosis and Testing
- Diagnosis And Testing - Single Pane Power Sunroof System
- Diagnosis And Testing - Dual Pane Power Sunroof System
- Technical SpecificationsTorque Specifications
MOTOR, Sunroof
Standard Procedure
- Dual Pane Sunroof Calibrations
- Single Pane Sunroof Calibrations
- Sunroof Or Sunshade Obstacle Detection Override
Removal and Installation
- Dual Pane Motor
- Single Pane Motor
MOTOR, Sunroof Shade, Dual Pane
- Removal and InstallationDual Pane Sunroof Shade Motor
- SWITCH, SunroofRemoval And Installation
Power Windows
- Description and OperationPower Windows
- Diagnosis and TestingPower Windows
MOTOR, Window Regulator
- Removal and InstallationWindow Regulator Motor
SWITCH, Power Window
- Diagnosis and TestingDiagnosis And Testing - Power Window Switches
- Removal and InstallationPower Window Switch
8P - Speed Control
Description and Operation
- Conventional Cruise Control
- Adaptive Cruise Control With Stop And Go
SWITCH, Speed Control
- Removal and InstallationSpeed Control Switch
8Q - Vehicle Theft Security
Description and Operation
- Sentry Key Immobilizer System
- Vehicle Theft Alarm
- Diagnosis and TestingKey Fob Testing
SWITCH, Hood Ajar
- Diagnosis and TestingDiagnosis And Testing - Hood Ajar Switch
- Removal and InstallationHood Ajar Switch
8R - Wipers/Washers
- Description And Operation
- Diagnosis and TestingFront Wiper System
- Technical SpecificationsTorque Specifications
Cleaning
- Washer System Cleaning
- Wiper System Cleaning
Inspection
- Washer System Inspection
- Wiper System Inspection
ARM, Wiper
- Removal and InstallationWiper Arm
BLADE, Wiper
- Removal and InstallationWiper Blade
LINKAGE, Wiper Arm
- Removal and InstallationWiper Arm Linkage
MODULE, Humidity Rain Light Sensor
Standard Procedure
- Protective Cap Removal
- Silicone Gelatin Pad Replacement
- Removal and InstallationHumidity Rain Light Sensor Module (Hrlsm)
MOTOR, Wiper
- Removal and InstallationWiper Motor
NOZZLE, Washer
Removal and Installation
- Washer Nozzle
- Trx Washer Nozzle
PUMP, Windshield Washer
- Removal and InstallationWindshield Washer Pump
RESERVOIR, Windshield Washer
- Removal and InstallationWindshield Washer Reservoir
SWITCH, Multifunction, Left
- Removal and InstallationLeft Multifunction Switch
SWITCH, Washer Fluid Level
- Removal and InstallationWasher Fluid Level Switch
8T - Navigation/Telecommunication
Description and Operation
- Hands Free Phone
- Navigation
- Uconnect + Siriusxm Guardian
Diagnosis and Testing
- Diagnosis And Testing - Hands Free Phone
- Diagnosis And Testing - Navigation
- Diagnosis And Testing - Uconnect + Siriusxm Guardian
Standard Procedure
- Navigation System - Restore Or Update
- Uconnect + Siriusxm Guardian System - Reinstall Applications
- Uconnect® + Siriusxm® Guardian™ System - Remove Accounts
ANTENNA, Long-Term Evolution 2 (LTE2)
- Diagnosis and TestingDiagnosis And Testing - Cellular Antenna
- Removal and InstallationLong Term Evolution 2 (Lte2) Antenna
ANTENNA, Navigation
- Diagnosis and TestingDiagnosis And Testing - Navigation Antenna
- Removal and InstallationNavigation Antenna
Microphone
- Diagnosis and TestingDiagnosis And Testing - Microphone
- Removal and InstallationMicrophone
8W - Power Distribution
- Description And Operation
- Diagnosis and TestingWireless Charging Pad Module
- Technical SpecificationsTorque Specifications
CENTER, Power Distribution (PDC)
Removal and Installation
- Power Distribution Center - Front
- Power Distribution Center - Interior
MODULE, Power Inverter
- Removal and InstallationPower Inverter Module (Pim)
MODULE, Wireless Charging Pad
Removal and Installation
- Wireless Charging Pad Module
- Wireless Charging Pad Module-Trx
OUTLET, Power
- Diagnosis and TestingDiagnosis And Testing - 115 V Power Outlet
Removal and Installation
- 12 Volt Outlet – Instrument Panel
- 115 Volt Outlet – Front
- 115 Volt Outlet – Ram Box
- 115 Volt Outlet - Rear
- Switch – Rambox 115 Volt Outlet
- Usb Charge Port - Console Lid
- Usb Charge Port - Rear Console
DESCRIPTION
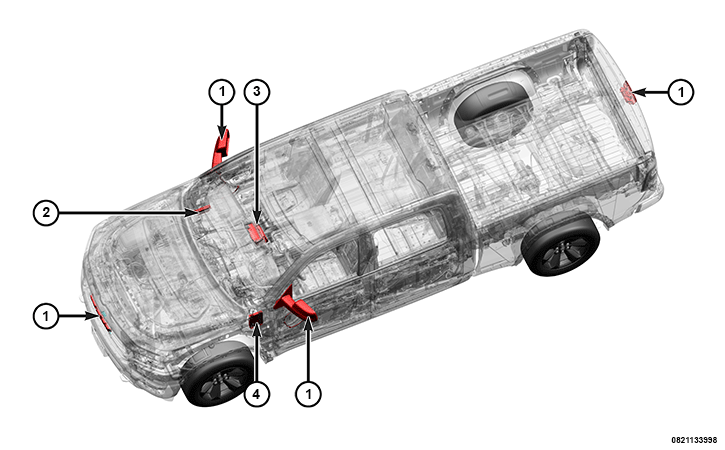 |
The Surround View Camera (SVC) System [Sales Code XAK] contains the following components:
Component Index
|
1. |
|
|
2. |
|
|
3. |
|
|
4. |
The SVC system is also known as the Bird's Eye View (BEV) camera system. This system is intended to provide a 360 degree top view by supporting four surround view cameras with a CVPM that seamlessly stitches the video feeds together and outputs it to a display screen.
This 360 degree top view intended to be a parking aid and to assist with eliminating blind spots from the driver vision.
OPERATION
The SVC system uses multiple cameras to provide situational awareness during maneuvers requiring real-time visual checks of the vehicle's perimeter.
The SVC system provides an automatically selected view with minimal distortion from which it is easy to judge distance and orientation to obstacles in the field of view.
The SVC system automatically displays an on-screen mirrored image of the rear surroundings behind the vehicle whenever the gear shift lever is placed into "REVERSE".
The SVC system views are displayed based on PRND status, vehicle speed and trajectory with more view options available through direct on-screen interaction on the touch screen display.
When enabled, active dynamic, multicolored gridlines are overlaid on the video image to illustrate the width of the vehicle and its projected path based on the steering wheel angle, wheelbase and direction of travel.
Body Control Module (BCM)
The BCM is responsible for gating messages between the different bus networks. The messages and signals used by the BCM to assist the SVC system are listed below.
Inputs
- Acquisition on the Controller Area Network-Chassis (CAN-C) bus of the air suspension status signal
- Acquisition on the CAN-C bus of the rear left park assist alert signal
- Acquisition on the CAN-C bus of the rear right park assist alert signal
- Acquisition on the CAN-C bus of the rear center park assist alert signal
- Acquisition on the CAN-C bus of the front left park assist alert signal
- Acquisition on the CAN-C bus of the front right park assist alert signal
- Acquisition on the CAN-C bus of the suspension leveling state
Outputs
- Transmission on the CAN-Interior High Speed (CAN-IHS) bus of the Commanded Ignition Status signal to the Radio
- Transmission on the CAN-IHS bus of the Transmission Type signal to the Radio
- Transmission on the CAN-IHS bus of the Reverse Gear Status signal to the Radio
- Transmission on the CAN-IHS bus of the PRND Status signal to the Radio
- Transmission on the CAN-IHS bus of the Vehicle Speed signal to the Radio
- Transmission on the CAN-IHS bus of the front left park assist alert signal to the CVPM
- Transmission on the CAN-IHS bus of the front center park assist alert signal to the CVPM
- Transmission on the CAN-IHS bus of the front right park assist alert signal to the CVPM
- Transmission on the CAN-IHS bus of the rear left park assist alert signal to the CVPM
- Transmission on the CAN-IHS bus of the rear center park assist alert signal to the CVPM
- Transmission on the CAN-IHS bus of the rear right park assist alert signal to the CVPM
- Transmission on the CAN-IHS bus of the vehicle speed signal to the CVPM
- ? Transmission on the CAN-IHS bus of the transmission type signal to the CVPM
- ? Transmission on the CAN-IHS bus of the reverse gear status signal to the CVPM
- ? Transmission on the CAN-IHS bus of the PRND status signal to the CVPM
- ? Transmission on the CAN-IHS bus of the steering wheel angle signal to the CVPM
- ? Transmission on the CAN-IHS bus of the steering wheel angle sensor status signal to the CVPM
- ? Transmission on the CAN-IHS bus of the language preference signal to the CVPM
- ? Transmission on the CAN-IHS bus of the air suspension status signal to the CVPM
Central Vision Processing Module (CVPM)
The CVPM receives:
- Signals from all four cameras
- The reverse gear status
- The steering angle signal
- The vehicle speed signal
- The door ajar switch status for all four doors and the tailgate
The CVPM uses these signals to process and determine dynamic grid line images. The CVPM uses the CAN-IHS network to send each of the images to the radio for display.
Inputs
- Acquisition on the CAN-IHS bus of the driver door ajar signal.
- Acquisition on the CAN-IHS bus of the passenger door ajar signal
- Acquisition on the CAN-IHS bus of the left rear door ajar signal,
- Acquisition on the CAN-IHS bus of the right rear door ajar signal
- Acquisition on the CAN-IHS bus of the trunk/tailgate ajar signal
- Acquisition on the CAN-IHS bus of the front left park assist alert signal
- Acquisition on the CAN-IHS bus of the front center park assist alert signal
- Acquisition on the CAN-IHS bus of the front right park assist alert signal
- Acquisition on internal signal Top+Rear when user select Top + Rear soft button
- Acquisition on internal signal Top+Front when user select Top + Front soft button
- Acquisition on internal signal Rear Crosspath when user select Rear Crosspath soft button
- Acquisition on internal signal Front Crosspath when user select Front Crosspath soft button
- Acquisition on internal signal Backup when user press ''Backup'' soft button in SVC screen
- Acquisition on internal signal CVPM button press When user press Image defeat on the Radio screen
- Acquisition on internal signal CVPM button press Not Pressed when user do not press Image defeat on the Radio screen
- Acquisition on internal signal CVPM zoom When press Zoom button on the Radio screen
- Acquisition on CAN-IHS bus signal for air suspension control module present/not present status
- Configuration of the surround view camera image based on the driver DYNAMIC GRIDLINES ON/OFF personalization selection
- Processing of the camera images: Distortion Correction, Projection Transformations
- Blend and Stitch the adjacent camera images together resulting in the surround view camera image
- Overlay a stylized vehicle (including corresponding doors and/or tailagate open/closed state) on the image relative to the camera view. All combinations of the doors and tailgate open/closed states shall be capable of being displayed
- Overlay soft buttons for selection and display of the default view or other customer-selectable views
- Map touch screen coordinates sent by the Radio to the soft buttons overlays and their associated functionality
- Store and recall dynamic gridline ON/OFF state information over the ignition cycle
Outputs
- Transmission on the CAN-IHS bus of the surround view camera image personalization selection signal to the Radio to indicate gridline personalization selected by the driver
- Transmission on the CAN-IHS bus of the surround view camera image defeat signal to the Radio to switch Head Unit back to non-camera display operation
- Transmit an video output signal to the Radio
- Transmission on the CAN-IHS bus of the display view status
Radio
The Radio receives multiple input signals in order to process and send a live video feed to the Display Screen Module (DSM).
Inputs
- Acquisition on the CAN-IHS bus of the reverse gear status signal
- Acquisition on the CAN-IHS bus of the transmission type signal
- Acquisition on the CAN-IHS bus of the vehicle speed signal
- Acquisition on the CAN-IHS bus of the PRND status signal
- Acquisition on the CAN-IHS bus of the 'image defeat' request signal
- Acquisition of the Radio touch screen coordinates pressed by the driver to enable the Surround View camera system and display the camera system image via the touch screen control
- Acquisition of the Radio touch screen coordinates pressed by the driver to enable the Rear View camera system and display the camera system image via the touch screen control
- Acquisition of the image defeat signal to disable display of the surround view camera image. NOTE: Image cannot be disabled when the transmission is in "REVERSE" gear.
- Acquisition of the Radio touch screen coordinates pressed by the driver to select the surround view camera menu screen personalization entry, DYNAMIC GRIDLINES ON/OFF (for example, enable/disable) for active dynamic grid lines.
- Acquisition of the Radio touch screen coordinates pressed by the driver to select surround view camera menu screen personalization entry, CAMERA DELAY ON/OFF (for example, enable/disable) for active camera delay.
- Acquisition on the CAN-IHS bus of the display view status signal
Outputs
- Transmission on the CAN-IHS bus of the Radio touch screen coordinates pressed by the driver to the CVPM.
- Transmission on the CAN-IHS bus of the surround view camera display status signal to the CVPM.
- Transmission on the CAN-IHS bus of the controls menu soft button status signal
Surround View Cameras (SVC)
There are four dedicated SVCs on this vehicle:
- Front view camera
- Left side camera - Integral to the exterior rearview mirror
- Right side camera - Integral to the exterior rearview mirror
- Rear view camera
All four cameras are mounted in a similar vertical position the same distance from the ground with an unobstructed 190 degree angle field of view. Both mirror mounted cameras are angled slightly rearward aiming at the center of the vehicle's right and left sides. Each camera feed has two inline connectors.
Each camera directly transmits a video and data output signal to the CVPM for processing.