Removal and Installation
Air Suspension Hose Assembly
▸Contents: 02 - Front Suspension
- Special Tools
Air Suspension
- Warning
- DescriptionAir Suspension
- Diagnosis And Testing
Standard Procedure
- Technical SpecificationsTorque Specifications
Air Line
COMPRESSOR ASSEMBLY, Air Suspension
HOSE ASSEMBLY, Air Suspension
RESERVOIR, Air Suspension
SENSOR, Height
Removal and Installation
Active Damping Suspension
- DescriptionDescription And Operation
SENSOR, Active Damping
Removal and Installation
- Front
- Rear
SENSOR, Height
Removal and Installation
- Front
- Rear
SHOCK ABSORBER, Active Damping
Removal and Installation
- Removal
- Removal
Wheel Alignment
- Diagnosis And Testing
Standard Procedure
- Alignment
- Curb Height Measurement
- Technical SpecificationsSpecifications
Front, Independent Front Suspension
- Description and OperationFront Suspension
Diagnosis and Testing
- Diagnosis And Testing
- Shock/Strut Diagnosis
- Technical SpecificationsTorque Specifications
ARM, Lower Control
Removal and Installation
- Lower Control Arm Without Trx
- Lower Control Arm With Trx
ARM, Upper Control
Removal and Installation
- Upper Control Arm Without Trx
- Upper Control Arm With Trx
BALL JOINT, Suspension, Lower
- Diagnosis And Testing
- Removal and InstallationLower Ball Joint
BALL JOINT, Suspension, Upper
- Diagnosis And Testing
- Removal and InstallationUpper Ball Joint
Hub And Bearing
- Diagnosis and TestingDiagnosis And Testing - Hub And Bearing Noise
- Removal and InstallationHub And Bearing
KNUCKLE, Steering
- Removal and InstallationSteering Knuckle
LINK, Stabilizer Bar
Removal and Installation
- Stabilizer Bar Link
- Stabilizer Bar Link - Trx/Rumblebee
SHOCK ABSORBER, Suspension
Removal and Installation
- Coil Over
- Air Suspension
- Coil Over With Trx
SPRING, Front
Removal and Installation
- Front Coil Spring
- Air Spring
STABILIZER BAR, Front
- Removal and InstallationFront Stabilizer Bar
REMOVAL
| WARNING: |
All pressurized air suspension components contain high pressure air (up to 220 psig). Use extreme caution when inspecting for leaks. Wear safety goggles and adequate protective clothing when inspecting or servicing the air suspension system. A sudden release of air under this amount of pressure can cause possible serious or fatal injury. |
| WARNING: |
Before performing any service on the air suspension system, the system must be disabled to prevent the system from changing ride height. Before any given component is to be serviced it must be deflated. Servicing the air suspension system without the system disabled, or with pressure in any specific component, can cause possible serious or fatal injury. |
- Raise and support the vehicle (Refer to 04 - Vehicle Quick Reference/Hoisting - Standard Procedure) .
- Remove the two air compressor stone shield bolts and the push pin fastener, then remove the stone shield.
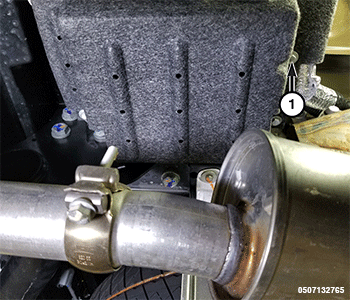
1 - Air Compressor Stone Shield Bolts - Push in the brown retainer ring on the air compressor and disconnect the outlet hose.
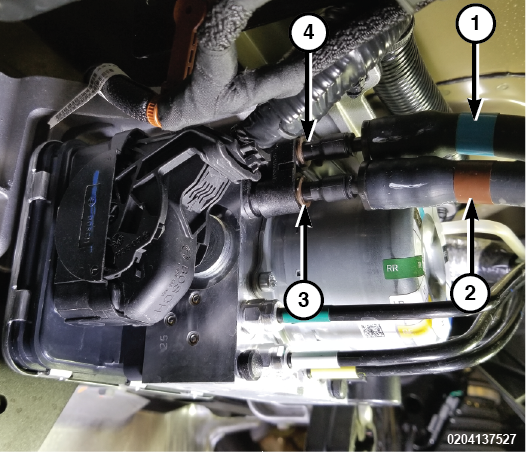
1 - Inlet Hose 2 - Outlet Hose 3 - Retainer Ring 4 - Retainer Ring - Push in the brown retainer ring on the air compressor and disconnect the inlet hose.
- Disconnect the air hose routing clip from the body.
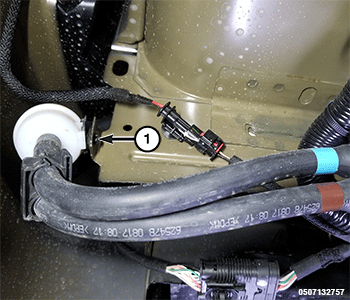
1 - Air Hose Routing Clip - Remove the support and lower the vehicle.
- Remove the right tail lamp assembly (Refer to 08 - Electrical/Lamps/Lighting - Exterior/LAMP, Tail Stop Turn/Removal and Installation) .
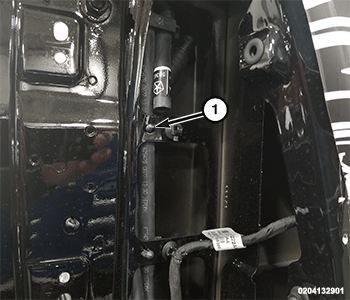
1 - Air Hose Routing Clips - Disconnect the two air hose routing clips from the body.
- Remove the air hose assembly.
INSTALLATION
Follow the removal procedure in reverse for general reassembly of the components on the vehicle. The steps listed below are calling out specific procedures that should be followed during installation.
| WARNING: |
All pressurized air suspension components contain high pressure air (up to 220 psig). Use extreme caution when inspecting for leaks. Wear safety goggles and adequate protective clothing when inspecting or servicing the air suspension system. A sudden release of air under this amount of pressure can cause possible serious or fatal injury. |
| WARNING: |
Before performing any service on the air suspension system, the system must be disabled to prevent the system from changing ride height. Before any given component is to be serviced it must be deflated. Servicing the air suspension system without the system disabled, or with pressure in any specific component, can cause possible serious or fatal injury. |
- Pay particular attention to the routing of the hoses. There can be no twisting or kinking of the hoses when reassembled.
- Before and while connecting the retaining clips, verify that there are no twists or kinks in the hoses.
- Insert the inlet hose nipple into the air compressor until the brown retainer ring engages.
- Insert the outlet hose nipple into the air compressor until the brown retainer ring engages.