Removal and Installation
Air Suspension
▸Contents: 02 - Front Suspension
- Special Tools
Air Suspension
- Warning
- DescriptionAir Suspension
- Diagnosis And Testing
Standard Procedure
- Technical SpecificationsTorque Specifications
Air Line
COMPRESSOR ASSEMBLY, Air Suspension
HOSE ASSEMBLY, Air Suspension
RESERVOIR, Air Suspension
SENSOR, Height
Removal and Installation
Active Damping Suspension
- DescriptionDescription And Operation
SENSOR, Active Damping
Removal and Installation
- Front
- Rear
SENSOR, Height
Removal and Installation
- Front
- Rear
SHOCK ABSORBER, Active Damping
Removal and Installation
- Removal
- Removal
Wheel Alignment
- Diagnosis And Testing
Standard Procedure
- Alignment
- Curb Height Measurement
- Technical SpecificationsSpecifications
Front, Independent Front Suspension
- Description and OperationFront Suspension
Diagnosis and Testing
- Diagnosis And Testing
- Shock/Strut Diagnosis
- Technical SpecificationsTorque Specifications
ARM, Lower Control
Removal and Installation
- Lower Control Arm Without Trx
- Lower Control Arm With Trx
ARM, Upper Control
Removal and Installation
- Upper Control Arm Without Trx
- Upper Control Arm With Trx
BALL JOINT, Suspension, Lower
- Diagnosis And Testing
- Removal and InstallationLower Ball Joint
BALL JOINT, Suspension, Upper
- Diagnosis And Testing
- Removal and InstallationUpper Ball Joint
Hub And Bearing
- Diagnosis and TestingDiagnosis And Testing - Hub And Bearing Noise
- Removal and InstallationHub And Bearing
KNUCKLE, Steering
- Removal and InstallationSteering Knuckle
LINK, Stabilizer Bar
Removal and Installation
- Stabilizer Bar Link
- Stabilizer Bar Link - Trx/Rumblebee
SHOCK ABSORBER, Suspension
Removal and Installation
- Coil Over
- Air Suspension
- Coil Over With Trx
SPRING, Front
Removal and Installation
- Front Coil Spring
- Air Spring
STABILIZER BAR, Front
- Removal and InstallationFront Stabilizer Bar
REMOVAL
| WARNING: |
After the front air spring is deflated, the pressure relief valve will still hold some pressure in the front air spring/shock assembly. If pressure relief valve removal is necessary, the vehicle must be hoisted with all four wheels off the ground, then the pressure relief valve must be slowly removed to allow residual pressure to vent. If the vehicle is not hoisted, the suspension could lower, causing injury. |
| WARNING: |
All pressurized air suspension components contain high pressure air (up to 220 psig). Use extreme caution when inspecting for leaks. Wear safety goggles and adequate protective clothing when inspecting or servicing the air suspension system. A sudden release of air under this amount of pressure can cause possible serious or fatal injury. |
| WARNING: |
Before performing any service on the air suspension system, the system must be disabled to prevent the system from changing ride height. Before any given component is to be serviced it must be deflated. Servicing the air suspension system without the system disabled, or with pressure in any specific component, can cause possible serious or fatal injury. |
| CAUTION: |
When removing an air line from a component and the air line is to be reused, do not remove the 90° fitting or the brass fitting from the air line. If either is removed, the air line must be replaced. Do not remove protective caps or plugs from air lines or components until ready to install the air line to prevent moisture or dirt intrusion. All air line fittings must be hand started to avoid cross threading. |
| NOTE: |
The air suspension system can be disabled and enabled by using the Display Screen Module in the vehicle under Tire Jack Mode which is the preferred method. If the Disable Level Control routine in the scan tool is used it will only disable the level control (automatic and manual) for that ignition cycle. The air suspension system can also be enabled by driving the vehicle above 5 mph. |
- With a scan tool, using the routines under the Air Suspension Control Module (ASCM), perform the following:
- Disconnect and isolate the negative battery cable(s) (Refer to 08 - Electrical/Battery System/Standard Procedure) .
- Raise and support the vehicle (Refer to 04 - Vehicle Quick Reference/Hoisting - Standard Procedure) .
- Remove the tire and wheel assembly (Refer to 22 - Tires and Wheels/Removal and Installation) .
- Support the lower control arm outboard end.
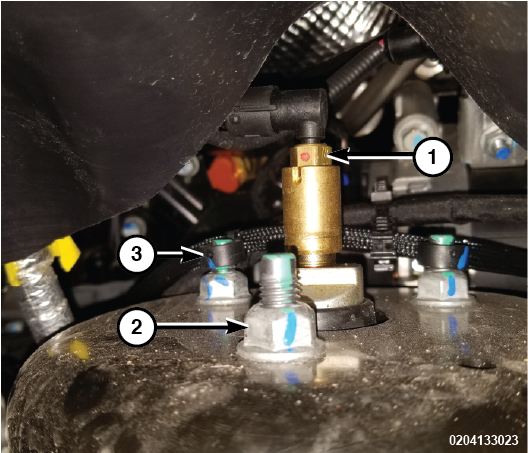
1 - Air Lines 2 - Mount Nut 3 - Air Line Routing Clips - Remove the two wiring harness routing clips from the shock mounting studs.
NOTE: Do not remove the fitting from the air line. During installation the same fitting will be used.
- Disconnect the air line and fitting from the air spring and shock absorber assembly.
- Remove the three shock absorber upper nuts.
- Remove the shock absorber lower bolt and nut.
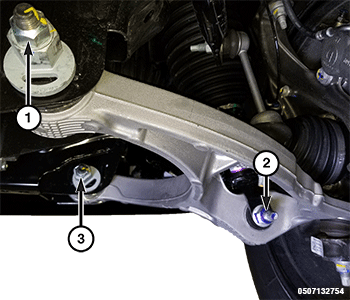
1 - Lower Control Arm Nut 2 - Shock Absorber Lower Bolt 3 - Lower Control Arm Nut - Remove the caliper adapter as an assembly with the brake caliper (Refer to 05 - Brakes, Base/Hydraulic/Mechanical/ADAPTER, Disc Brake Caliper/Removal and Installation) .
- Remove the brake rotor (Refer to 05 - Brakes, Base/Hydraulic/Mechanical/ROTOR, Brake/Removal and Installation) .
- Disengage the wheel speed sensor wire harness from the front wheel speed sensor routing bracket and from the upper control arm.
- Remove the upper ball joint nut and separate the upper ball joint from the knuckle using ball Joint Remover Remover, Ball Joint 8677 .
- Disconnect the stabilizer bar link from the lower control arm (Refer to 02 - Front Suspension/Front/LINK, Stabilizer Bar/Removal and Installation) .
- Remove the halfshaft nut (Refer to 02 - Front Suspension/Front/HUB AND BEARING/Removal and Installation) .
- Remove the shock absorber.
INSTALLATION
| WARNING: |
All pressurized air suspension components contain high pressure air (up to 220 psig). Use extreme caution when inspecting for leaks. Wear safety goggles and adequate protective clothing when inspecting or servicing the air suspension system. A sudden release of air under this amount of pressure can cause possible serious or fatal injury. |
| WARNING: |
Before performing any service on the air suspension system, the system must be disabled to prevent the system from changing ride height. Before any given component is to be serviced it must be deflated. Servicing the air suspension system without the system disabled, or with pressure in any specific component, can cause possible serious or fatal injury. |
| CAUTION: |
When removing an air line from a component and the air line is to be reused, do not remove the 90° fitting or the brass fitting from the air line. If either is removed, the air line must be replaced. Do not remove protective caps or plugs from air lines or components until ready to install the air line to prevent moisture or dirt intrusion. All air line fittings must be hand started to avoid cross threading. |
| NOTE: |
In any instance where a bolt is through a rubber bushing, the bolt must be torqued with the vehicle at normal ride height. |
- Position the shock absorber in the strut tower.
- Install the three shock absorber upper nuts and tighten to the proper (Torque Specifications) .
1 - Air Lines 2 - Mount Nut 3 - Air Line Routing Clips - Position the shock absorber lower clevis to the lower control arm shock bushing.
1 - Lower Control Arm Nut 2 - Shock Absorber Lower Bolt 3 - Lower Control Arm Nut - Install the shock absorber lower bolt and nut but do not tighten at this time .
NOTE: When positioning the steering knuckle to the upper ball joint verify the halfshaft inserts smoothly and is fully engaged in the hub and bearing splines.
- Insert the upper ball joint stud into the steering knuckle then install the upper ball joint nut and tighten to the proper (Torque Specifications) .
- Install the halfshaft nut (Refer to 02 - Front Suspension/Front/HUB AND BEARING/Removal and Installation) .
- Connect the stabilizer bar link to the lower control arm (Refer to 02 - Front Suspension/Front/LINK, Stabilizer Bar/Removal and Installation) .
- Secure the wheel speed sensor harness to the front wheel speed sensor routing bracket and to the upper control arm.
- Install the brake rotor (Refer to 05 - Brakes, Base/Hydraulic/Mechanical/ROTOR, Brake/Removal and Installation) .
- Install the caliper adapter with the caliper as an assembly (Refer to 05 - Brakes, Base/Hydraulic/Mechanical/ADAPTER, Disc Brake Caliper/Removal and Installation) .
- Remove the support from the lower control arm outboard end.
- Install the tire and wheel assembly (Refer to 22 - Tires and Wheels/Removal and Installation) .
- Remove the support and lower the vehicle.
- With a scan tool, under the Air Suspension Control Module (ASCM), perform the following:
NOTE: The air suspension system can be disabled and enabled by using the Display Screen Module (DSM) in the vehicle under Tire Jack Mode which is the preferred method. If the Disable Level Control routine in the scan tool is used it will only disable the level control (automatic and manual) for that ignition cycle. The air suspension system can also be enabled by driving the vehicle above 5 mph.
- Tighten the shock absorber lower bolt to the proper (Torque Specifications) .
- Perform the ASCM Verification Test (Refer to 28 - DTC-Based Diagnostics/MODULE, Air Suspension Control (ASCM) - Standard Procedure) .