Removal and Installation
Coil Over
▸Contents: 02 - Front Suspension
- Special Tools
Air Suspension
- Warning
- Description and OperationAir Suspension
- Diagnosis And Testing
Standard Procedure
- Technical SpecificationsTorque Specifications
Air Line
COMPRESSOR ASSEMBLY, Air Suspension
HOSE ASSEMBLY, Air Suspension
RESERVOIR, Air Suspension
SENSOR, Height
Removal and Installation
Front, Independent Front Suspension
- Description and OperationFront Suspension
Diagnosis and Testing
- Technical SpecificationsTorque Specifications
ARM, Lower Control
Removal and Installation
ARM, Upper Control
Removal and Installation
BALL JOINT, Suspension, Lower
BALL JOINT, Suspension, Upper
KNUCKLE, Steering
LINK, Stabilizer Bar
Removal and Installation
SHOCK ABSORBER, Suspension
Removal and Installation
SPRING, Front
Removal and Installation
STABILIZER BAR, Front
Wheel Alignment
REMOVAL
- Disconnect and isolate the negative battery cable(s) (Refer to 08 - Electrical/Battery System/Standard Procedure) .
- Raise and support the vehicle (Refer to 04 - Vehicle Quick Reference/Hoisting/Standard Procedure) .
- Remove the tire and wheel assembly (Refer to 22 - Tires and Wheels/Removal and Installation) .
- Support the lower control arm outboard end.
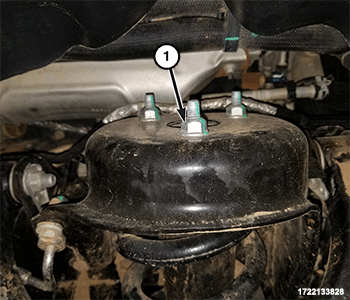
- Remove the three shock absorber upper nuts.
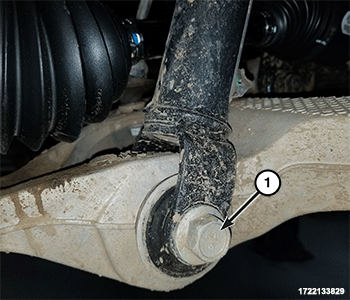
1 - Shock Absorber Upper Nuts - Remove the lower shock bolt and nut.
CAUTION: Never allow the disc brake caliper to hang from the brake hose. Damage to the brake hose will result. Provide a suitable support to hang the caliper securely.
1 - Lower Shock Bolt - Remove the caliper adapter as an assembly with the brake caliper (Refer to 05 - Brakes, Base/Hydraulic/Mechanical/ADAPTER, Disc Brake Caliper/Removal and Installation) .
- Remove the brake rotor (Refer to 05 - Brakes, Base/Hydraulic/Mechanical/ROTOR, Brake/Removal and Installation) .
- Disengage the wheel speed sensor wire harness from the front wheel speed sensor routing bracket and from the upper control arm.
- Remove the upper ball joint nut and separate the upper ball joint from the knuckle using ball Joint Remover Remover, Ball Joint 8677 .
- Disconnect the stabilizer bar link from the lower control arm (Refer to 02 - Front Suspension/Front/LINK, Stabilizer Bar/Removal and Installation) .
- Remove the halfshaft nut (Refer to 02 - Front Suspension/Front/HUB AND BEARING/Removal and Installation) .
- Remove the shock absorber assembly.
- Compress the coil spring in a suitable strut spring compressor.
CAUTION: Never use impact or high speed tools to remove the strut rod nut. Damage to the strut internal bearings can occur.
- Have a helper support the shock absorber from below, hold the strut rod with a suitable socket then use tool Wrench, Strut Nut 9362 to remove the strut rod nut.
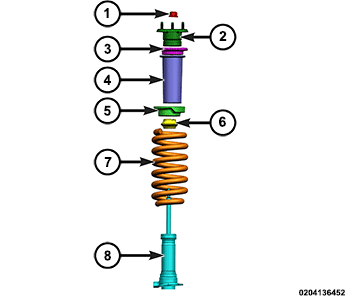
1 - Strut Rod Nut 5 - Spring Isolator 2 - Upper Strut Mount 6 - Jounce Bumper 3 - Upper Spacer 7 - Spring 4 - Shield 8 - Shock Absorber - Remove the upper strut mount, the upper spacer, the shield, the spring isolator, the jounce bumper, and the shock absorber.
- Release the spring compressor and remove the coil spring from the strut spring compressor.
INSTALLATION
| NOTE: |
In any instance where a bolt is through a rubber bushing, the bolt must be torqued with the vehicle at normal ride height. |
- Compress the coil spring in a suitable strut spring compressor.
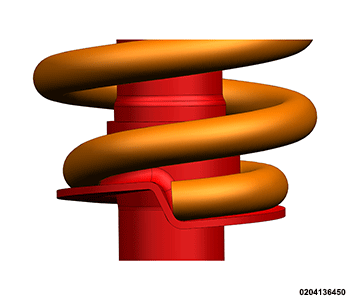
- Have a helper position the shock absorber to the coil spring from below and verify that the coil spring lower end is correctly aligned to the spring stop as shown.
- Install the jounce bumper, the spring isolator, the shield, the upper spacer, the upper strut mount, and the strut rod nut.
CAUTION: Never use impact or high speed tools to remove the strut rod nut. Damage to the strut internal bearings can occur.
1 - Strut Rod Nut 5 - Spring Isolator 2 - Upper Strut Mount 6 - Jounce Bumper 3 - Upper Spacer 7 - Spring 4 - Shield 8 - Shock Absorber - Have a helper support the shock absorber from below, hold the strut rod with a suitable socket then use tool Wrench, Strut Nut 9362 to install the strut rod nut and tighten to the proper (Torque Specifications) .
- Release the spring compressor and remove the strut assembly from the strut spring compressor.
- Position the coil over shock assembly in the strut tower.
1 - Shock Absorber Upper Nuts - Install the three shock absorber upper nuts and tighten to the proper (Torque Specifications) .
- Position the lower clevis to the lower control arm shock bushing.
1 - Lower Shock Bolt - Install the shock absorber lower bolt and nut but do not tighten at this time .
NOTE: When positioning the steering knuckle to the upper ball joint verify the halfshaft inserts smoothly and is fully engaged in the hub and bearing splines.
- Insert the upper ball joint stud into the steering knuckle then install the upper ball joint nut and tighten to the proper (Torque Specifications) .
- Install the halfshaft nut (Refer to 02 - Front Suspension/Front/HUB AND BEARING/Removal and Installation) .
- Connect the stabilizer bar link to the lower control arm (Refer to 02 - Front Suspension/Front/LINK, Stabilizer Bar/Removal and Installation) .
- Secure the wheel speed sensor harness to the front wheel speed sensor routing bracket and to the upper control arm.
- Install the brake rotor (Refer to 05 - Brakes, Base/Hydraulic/Mechanical/ROTOR, Brake/Removal and Installation) .
- Install the caliper adapter with the caliper as an assembly (Refer to 05 - Brakes, Base/Hydraulic/Mechanical/ADAPTER, Disc Brake Caliper/Removal and Installation) .
- Remove the support from the lower control arm outboard end.
- Install the tire and wheel assembly (Refer to 22 - Tires and Wheels/Removal and Installation) .
- Remove the support and lower the vehicle.
- Tighten the shock absorber lower bolt (1) to the proper (Torque Specifications) .
- Connect the negative battery cable(s) (Refer to 08 - Electrical/Battery System/Standard Procedure) .