Diagnosis and Testing
Shock/Strut Diagnosis
▸Contents: 02 - Front Suspension
- Special Tools
Air Suspension
- Warning
- Description and OperationAir Suspension
- Diagnosis And Testing
Standard Procedure
- Technical SpecificationsTorque Specifications
Air Line
COMPRESSOR ASSEMBLY, Air Suspension
HOSE ASSEMBLY, Air Suspension
RESERVOIR, Air Suspension
SENSOR, Height
Removal and Installation
Front, Independent Front Suspension
- Description and OperationFront Suspension
Diagnosis and Testing
- Technical SpecificationsTorque Specifications
ARM, Lower Control
Removal and Installation
ARM, Upper Control
Removal and Installation
BALL JOINT, Suspension, Lower
BALL JOINT, Suspension, Upper
KNUCKLE, Steering
LINK, Stabilizer Bar
Removal and Installation
SHOCK ABSORBER, Suspension
Removal and Installation
SPRING, Front
Removal and Installation
STABILIZER BAR, Front
Wheel Alignment
Shocks and struts can fail in a couple of ways. One being a leak, bushing failures, and ride degradation. The bullets points below list how to check these conditions and the graphics show normal oil misting compared to a leaking shock/strut.
- A knocking or rattling noise from a shock absorber may be caused by movement between mounting bushings and metal brackets or attaching components. These noises can usually be stopped by tightening the attaching nuts. If the noise persists, inspect for damaged and worn bushings, and attaching components. Repair as necessary if any of these conditions exist.
- A squeaking noise from the shock absorber may be caused by the hydraulic valving and may be intermittent. This condition is not repairable and the shock absorber must be replaced.
NOTE: This can also occasionally come from the a shock or strut bushing. Attempt to verify the bushings are good before replacing the shock/strut.
NOTE: The shock absorber bushings do not require any type of lubrication. Do not attempt to stop bushing noise by lubricating them. Grease and mineral oil-base lubricants will deteriorate the bushing. - To test a shock absorber for ride degradation, hold it in an upright position and force the piston in and out of the cylinder four or five times. The action throughout each stroke should be smooth and even. The shock rod should move up and down smoothly without binding or sticking. Struts can be tested in the same manner but must be disassembled (spring removed) to check. This procedure does not apply to load leveling shocks.
- When checking the shocks/struts visual condition it should be noted that slight oil dampness or “misting” does not indicate the unit has failed. Below are examples of misting shocks and a failed leaking shock:
NOTE: The shock absorbers are not refillable or adjustable. If a malfunction (excessive leak) occurs, the shock/strut must be replaced.
IMAGE OF LIGHT and MEDIUM MISTING STRUTS/SHOCKS (DO NOT REPLACE)
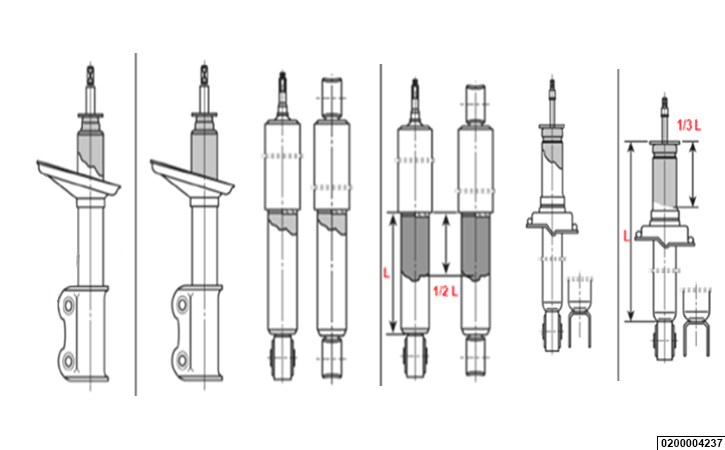 |
This image shows normal misting of a strut or shock. The reasons misting occurs is usually from evaporation of shock fluid from the rod under heated conditions. The evaporated fluid condenses and forms a mist on the shock body and cover. This is normal because a certain amount of shock oil must stay on the rod to lubricate it. Some misting accumulation is normal and does not degrade ride performance. Misting is most likely to be noticed at higher mileages due to accumulation.
IMAGE OF STRUTS/SHOCKS EXHIBITING AN OIL LEAK/DRIP ON ONE SIDE OF THE TUBE (REPLACE)
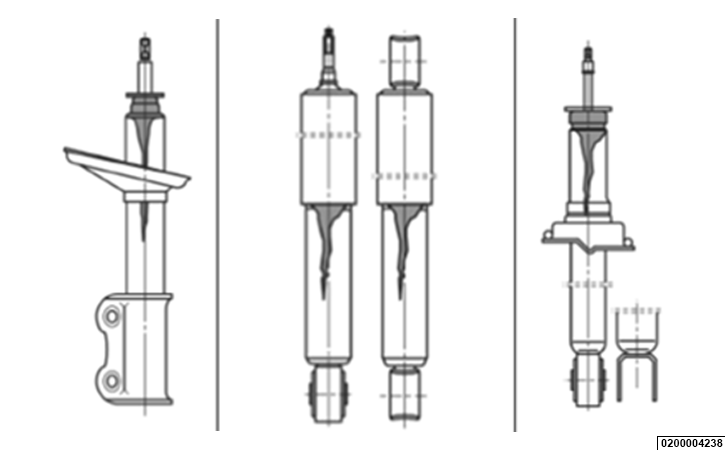 |
This image shows struts and shocks with an excessive drip or run on one line on the body of the shock or strut. Excessive runs and drips are something different and likely is caused by damage to the rod or sealing system.
IMAGE OF FAILED LEAKING STRUTS/SHOCKS (REPLACE)
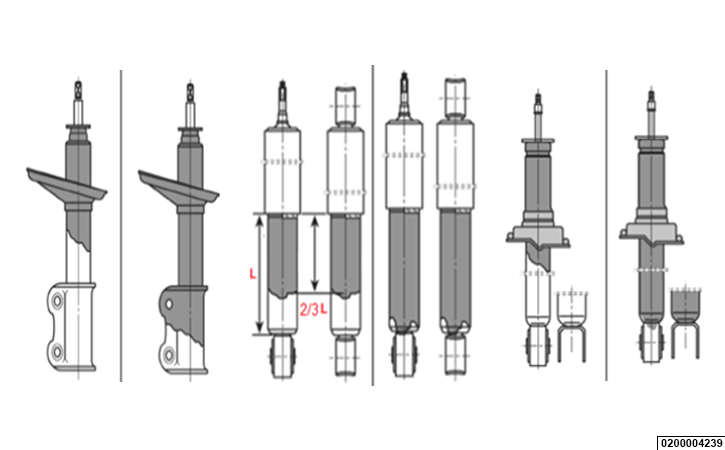 |
This image show struts and shocks that exhibit excessive oil leakage. This is determined by oil evenly around the body of the strut or shock that is at passed the spring seating surface or a strut or shock with spring, or at least 2/3 of the way down the body of a standard shock.