Removal and Installation
Rear Air Lines
▸Contents: 02 - Front Suspension
- Special Tools
Air Suspension
- Warning
- Description and OperationAir Suspension
- Diagnosis And Testing
Standard Procedure
- Technical SpecificationsTorque Specifications
Air Line
COMPRESSOR ASSEMBLY, Air Suspension
HOSE ASSEMBLY, Air Suspension
RESERVOIR, Air Suspension
SENSOR, Height
Removal and Installation
Front, Independent Front Suspension
- Description and OperationFront Suspension
Diagnosis and Testing
- Technical SpecificationsTorque Specifications
ARM, Lower Control
Removal and Installation
ARM, Upper Control
Removal and Installation
BALL JOINT, Suspension, Lower
BALL JOINT, Suspension, Upper
KNUCKLE, Steering
LINK, Stabilizer Bar
Removal and Installation
SHOCK ABSORBER, Suspension
Removal and Installation
SPRING, Front
Removal and Installation
STABILIZER BAR, Front
Wheel Alignment
REMOVAL
| WARNING: |
All pressurized air suspension components contain high pressure air (up to 220 psig). Use extreme caution when inspecting for leaks. Wear safety goggles and adequate protective clothing when inspecting or servicing the air suspension system. A sudden release of air under this amount of pressure can cause possible serious or fatal injury. |
| WARNING: |
Before performing any service on the air suspension system, the system must be disabled to prevent the system from changing ride height. Before any given component is to be serviced it must be deflated. Servicing the air suspension system without the system disabled, or with pressure in any specific component, can cause possible serious or fatal injury. |
| CAUTION: |
When removing an air line from a component and the air line is to be reused, do not remove the 90° fitting or the brass fitting from the air line. If either is removed, the air line must be replaced. Do not remove protective caps or plugs from air lines or components until ready to install the air line to prevent moisture or dirt intrusion. All air line fittings must be hand started to avoid cross threading. |
| CAUTION: |
Pay special attention to the air line/bundle routing during the removal process for proper routing during installation. The air lines must be routed the same when installed AND connected to all routing clips during installation or a leak may result. |
| NOTE: |
New fittings must be used with new air lines, and new air lines do not include new fittings. |
| NOTE: |
The air suspension system can be disabled and enabled by using the Display Screen Module (DSM) in the vehicle under tire jack mode, which is the preferred method. If the disable level control routine in the scan tool is used it will only disable the level control (automatic and manual) for that ignition cycle. The air suspension system can also be enabled by driving the vehicle above 8 km/h (5 mph). The air suspension should be disabled prior to lifting the vehicle or performing any work. |
- With a scan tool, using the routines under the Air Suspension Control Module (ASCM), perform the following:
- Raise and support the vehicle (Refer to 04 - Vehicle Quick Reference/Hoisting - Standard Procedure) .
- Remove the tire and wheel assembly (Refer to 22 - Tires and Wheels/Removal and Installation) .
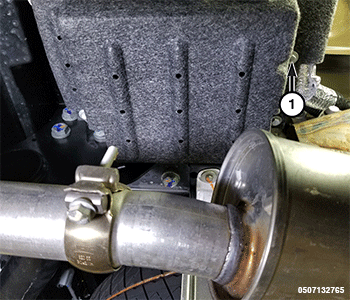
- Remove the two air compressor stone shield bolts and the push pin fastener, then remove the air compressor stone shield.
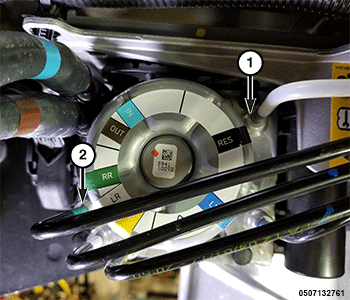
1 - Air Supply Compressor Stone Shield Bolts - Disconnect both the left rear and the right rear air spring air lines from the air compressor.
NOTE: Each specific air line is labeled on the air compressor. The air lines are color coded with tape for identification. The tape colors on the air lines match the label colors on the air compressor.
1 - Reservoir Line Fitting 2 - Rear Air Spring Air Lines - Lower the vehicle enough to access the lines at the air springs.
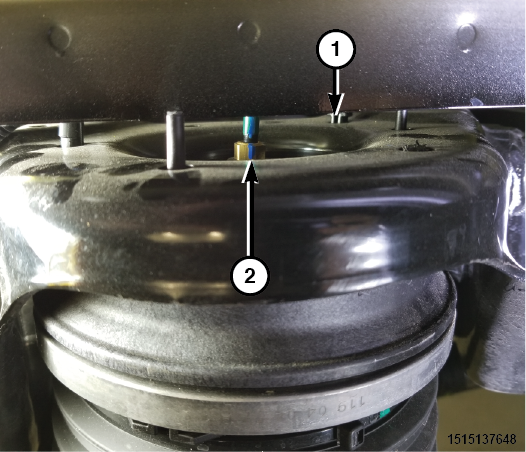
- Disconnect both air lines from both rear air springs.
1 - Air Spring Retainer Clip 2 - Rear Air Line - Disengage the air line routing clips that are attaching the rear air line bundle to the frame.
- Remove the rear air lines.
INSTALLATION
Follow the removal procedure in reverse for general reassembly of the components on the vehicle. The steps listed below are calling out specific procedures that should be followed during installation.
| WARNING: |
All pressurized air suspension components contain high pressure air (up to 220 psig). Use extreme caution when inspecting for leaks. Wear safety goggles and adequate protective clothing when inspecting or servicing the air suspension system. A sudden release of air under this amount of pressure can cause possible serious or fatal injury. |
| WARNING: |
Before performing any service on the air suspension system, the system must be disabled to prevent the system from changing ride height. Before any given component is to be serviced it must be deflated. Servicing the air suspension system without the system disabled, or with pressure in any specific component, can cause possible serious or fatal injury. |
| CAUTION: |
When removing an air line from a component and the air line is to be reused, do not remove the 90° fitting or the brass fitting from the air line. If either is removed, the air line must be replaced. Do not remove protective caps or plugs from air lines or components until ready to install the air line to prevent moisture or dirt intrusion. All air line fittings must be hand started to avoid cross threading. |
| CAUTION: |
The air lines/bundle must be routed the same when installed AND connected to all routing clips during installation or a leak may result. |
- New fittings must be used with new air lines, and new air lines do not include new fittings.
- The air lines must be connected to all routing clips during installation.
- Working at the air spring end of the air line, install a NEW air line fitting on each rear air spring assembly if new air lines are being installed.
- Install the air lines to the two rear air spring assemblies by pushing the line straight into the fitting until seated, then pulling to verify it is seated.
- Working at the air compressor end of the air line, install a NEW air line fitting in the air compressor for each of the rear air spring air lines if new air lines are being installed.
- Each specific air line is labeled on the air compressor. The air lines are color coded with tape for identification. The tape colors on the air lines match the label colors on the air compressor.
- Install the correct air lines to the rear air spring air line positions on the air compressor by pushing the line straight into the fitting until seated, then pulling to verify it is seated.
- With a scan tool, under the Air Suspension Control Module (ASCM), perform the following:
- Perform the ASCM Verification Test (Refer to 28 - DTC-Based Diagnostics/MODULE, Air Suspension Control (ASCM) - Standard Procedure) .
 TORQUE SPECIFICATIONS - AIR SUSPENSION