Standard Procedure
Brake System Bleeding
▸Contents: 05 - Brakes
05 - Brakes, ABS
- Description and OperationAnti-Lock Brake System (Abs)
- Standard ProcedureStandard Procedure - Antilock Brake System Bleeding
- Technical SpecificationsTorque Specifications
Electrical
SENSOR, Wheel Speed, Front
SENSOR, Wheel Speed, Rear
SWITCH, Electronic Stability Program (ESP)
Hydraulic/Mechanical
Integrated Control Unit (Icu)
Removal and Installation
Hydraulic Control Unit (Hcu)
Removal and Installation
05 - Brakes, Base
- Warning
- Caution
- DescriptionBase Brake System
- Diagnosis And Testing
- Standard ProcedureBrake System Bleeding
- Special Tools
Technical Specifications
Electrical
SWITCH, Brake Fluid Level
Removal and Installation
SWITCH, Adjustable Pedals
PUMP, Electric Vacuum
- SENSOR, Vacuum PressureRemoval And Installation
Hydraulic/Mechanical
ADAPTER, Disc Brake Caliper
Removal and Installation
CALIPER, Disc Brake, Front
CALIPER, Disc Brake, Rear
MASTER CYLINDER, Brake
PADS, Brake, Front
PADS, Brake, Rear
PEDAL(S), Brake and/or Accelerator
ROTOR, Brake
- Diagnosis and TestingDiagnosis And Testing - Disc Brake Rotor
Removal and Installation
Parking Brake
- Description And Operation
ACTUATOR, Electric Park Brake
SWITCH, Electric Park Brake
BASE BRAKE BLEEDING
| NOTE: |
Before removing the master cylinder reservoir cap, thoroughly clean the cap and master cylinder fluid reservoir to prevent dirt and other foreign matter from dropping into the master cylinder fluid reservoir. |
| NOTE: |
When bleeding the brake system, some air may be trapped in the brake lines far upstream, as much as ten feet from the bleeder screw. It is essential to have a fast flow with a large volume of brake fluid, which is why the pressure bleed method is recommended for bleeding the brakes to ensure all the air gets moved to the calipers and out. |
Follow the procedure listed below to completely bleed the brake system:
| NOTE: |
Pressure bleeding is the preferred and recommended method. MANUAL BLEEDING CAN NOT BE PERFORMED ON VEHICLES EQUIPPED WITH EBOOST SYSTEM. |
- First perform the pressure bleed or manual bleed procedure listed below at all four wheels. If using a pressure bleeder, use 35-40 PSI to force the air out the system.
- Next, perform brake bleed routine with scan tool following all prompts.
- Repeat the pressure or manual bleed procedure again.
- On vehicles equipped with EBOOST system, use the scan tool navigate to Misc. functions and run Hydraulic Prove Out Test. Ensure it completes successfully. If test fails, run full bleed procedure again.
The following wheel sequence should be used when bleeding the brake hydraulic system. The use of this wheel sequence will ensure adequate removal of all trapped air from the brake hydraulic system.
The correct fluid level is to the MAX indicator on the side of the reservoir. If necessary, add fluid to the proper level.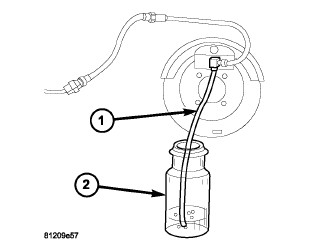 |
|
|
| 1 – Bleed Hose |
| 2 – Glass Container |
- Install Cap, Master Cylinder 6921 Cap, Master Cylinder 6921 on the master cylinder fluid reservoir. Attach the fluid hose from the pressure bleeder to the fitting on the master cylinder cap.
- Follow the manufacturer’s instructions carefully when using pressure equipment. 35-40 psi is required to properly bleed the air out of the system.
- Attach Bleed Tube 8358-1 Bleed Tube 8358-1 (1) to the bleeder screw and feed the hose into a clear jar (2) containing enough fresh brake fluid to submerge the end of the hose.
- Open the left rear bleeder screw at least one full turn or more to obtain a steady stream of brake fluid.
- After approximately 120-240 ml (4-8 ounces) of fluid have been bled through the brake circuit and an air-free flow is maintained in the clear plastic hose and jar, close the bleeder screw.
- Repeat this procedure at all the remaining bleeder screws in the order provided above.
- Check and adjust brake fluid level to the FULL mark on the reservoir.
- Check brake pedal travel and feel. If pedal travel is excessive or if the pedal feels excessively spongy, some air may still be trapped in the system. Re-bleed the brakes as necessary.
- Once all the air has been removed with the pressure bleed process, connect a scan tool and perform the “ABS Bleed”.
- After performing the “ABS Bleed” through the scan tool, repeat the pressure bleed process.
MANUAL BLEEDING (MANUAL BLEEDING CAN NOT BE PERFORMED ON VEHICLES EQUIPPED WITH EBOOST SYSTEM)
|
|
|
| 1 – Bleed Hose |
| 2 – Glass Container |
| NOTE: |
To bleed the brakes manually, the aid of a helper will be required. |
- Attach Bleed Tube 8358-1 Bleed Tube 8358-1 to the bleeder screw and feed the hose into a clear jar containing enough fresh brake fluid to submerge the end of the hose.
- Have a helper pump the brake pedal three or four times and hold it in the down position.
- With the pedal in the down position, open the left rear bleeder screw at least one full turn.
- Once the brake pedal has dropped, close the bleeder screw. After the bleeder screw is closed, release the brake pedal.
- Repeat the above steps until all trapped air is removed from that wheel circuit (usually four or five times).
- Bleed the remaining wheel circuits in the order provided above in the same manner until all air is removed from the brake system. Monitor the fluid level in the master cylinder reservoir to make sure it does not drop below the minimum mark.
- Check and adjust brake fluid level to the FULL mark.
- Check brake pedal travel and feel. If pedal travel is excessive or if the pedal feels excessively spongy, some air may still be trapped in the system. Re-bleed the brakes as necessary
- Once all the air has been removed with the manual bleed process, connect a scan tool and perform the “ABS Bleed”.
- After performing the “ABS Bleed” through the scan tool, repeat the manual bleed process.