Removal and Installation
Front Brake Pads
▸Contents: 05 - Brakes
05 - Brakes, ABS
- Description and OperationAnti-Lock Brake System (Abs)
- Standard ProcedureStandard Procedure - Antilock Brake System Bleeding
- Technical SpecificationsTorque Specifications
Electrical
SENSOR, Wheel Speed, Front
SENSOR, Wheel Speed, Rear
SWITCH, Electronic Stability Program (ESP)
Hydraulic/Mechanical
Integrated Control Unit (Icu)
Removal and Installation
Hydraulic Control Unit (Hcu)
Removal and Installation
05 - Brakes, Base
- Warning
- Caution
- DescriptionBase Brake System
- Diagnosis And Testing
- Standard ProcedureBrake System Bleeding
- Special Tools
Technical Specifications
Electrical
SWITCH, Brake Fluid Level
Removal and Installation
SWITCH, Adjustable Pedals
PUMP, Electric Vacuum
- SENSOR, Vacuum PressureRemoval And Installation
Hydraulic/Mechanical
ADAPTER, Disc Brake Caliper
Removal and Installation
CALIPER, Disc Brake, Front
CALIPER, Disc Brake, Rear
MASTER CYLINDER, Brake
PADS, Brake, Front
PADS, Brake, Rear
PEDAL(S), Brake and/or Accelerator
ROTOR, Brake
- Diagnosis and TestingDiagnosis And Testing - Disc Brake Rotor
Removal and Installation
Parking Brake
- Description And Operation
ACTUATOR, Electric Park Brake
SWITCH, Electric Park Brake
REMOVAL
- Raise and support the vehicle (Refer to 04 - Vehicle Quick Reference/Hoisting - Standard Procedure) .
- Remove the wheel and tire assembly (Refer to 22 - Tires and Wheels/Removal and Installation) .
CAUTION: Never allow the disc brake caliper to hang from the brake hose. Damage to the brake hose will result. Provide a suitable support to hang the caliper securely.
- Remove the front brake caliper from the brake caliper adapter (Refer to 05 - Brakes, Base/Hydraulic/Mechanical/CALIPER, Disc Brake, Front/Removal and Installation) .
- Remove the inboard brake pad.
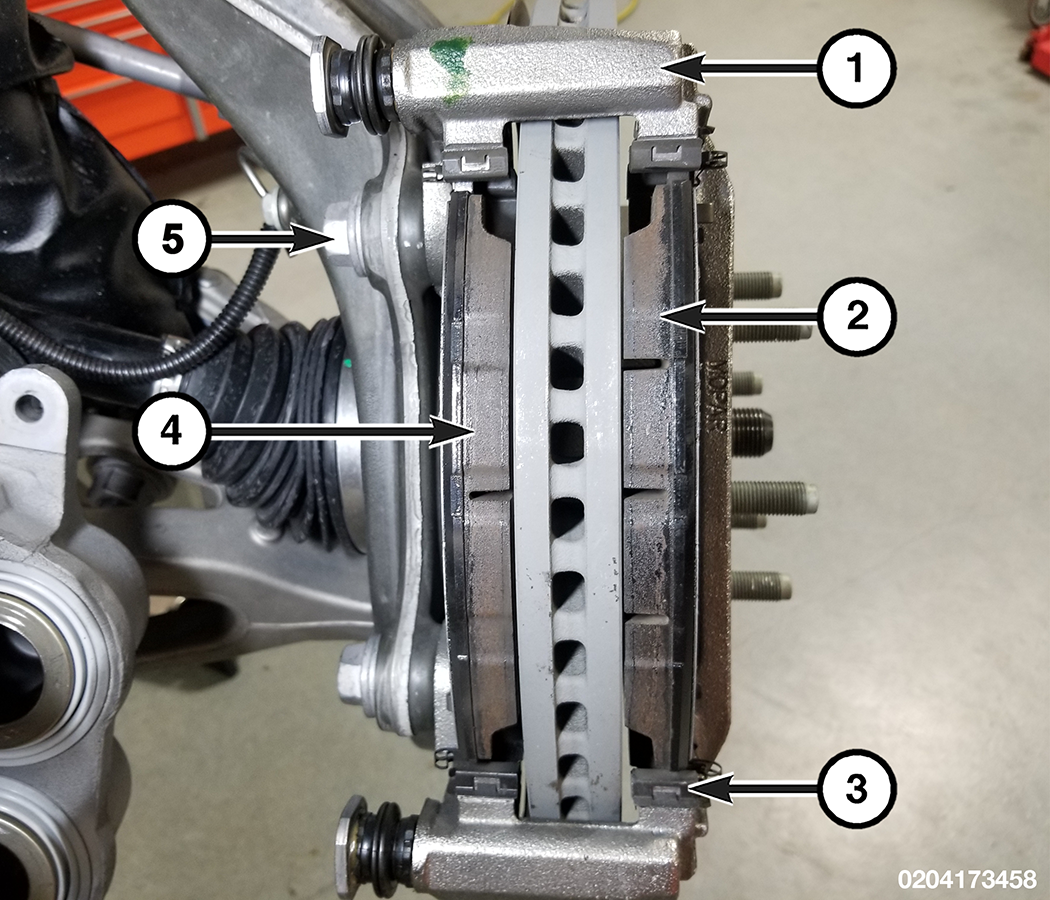
1 - Brake Caliper Adapter 2 - Outboard Brake Pad 3 - Anti-Rattle Clips 4 - Inboard Brake Pad 5 - Bolt - Remove the outboard brake pad.
- Remove and DISCARD the anti-rattle clips.
- Clean corrosion from the anchor bracket using brake cleaner, a wire brush, and a clean cloth.
INSTALLATION
Follow the removal procedure in reverse for general reassembly of the components on the vehicle. The steps listed below are calling out specific procedures that should be followed during installation.
- Use a suitable tool to compress the brake caliper pistons fully into the brake caliper.
- The brake caliper adapters must be free of rust and debris before the anti-rattle clips are installed.
- Apply grease to the new pad clips per the instructions in the pad kit or the clip kit.
- Install NEW anti-rattle clips.
- For TRX models the brake pad with one relief slot in the friction material MUST be installed on the inboard side of the brake rotor, and the brake pad with three relief slots in the friction material MUST be installed on the outboard side of the brake rotor.
- Apply brake pressure several times to seat the brake pads and obtain a firm brake pedal.
- Top off the brake fluid level.