Adjustments
Adjustments - M250
▸Contents: 03 - Differential and Driveline
Description and Operation
Diagnosis and Testing
ASSEMBLY, Differential
Disassembly and Assembly
Actuator/Motor
GEAR, Ring and Pinion
Removal and Installation
Joints
SHAFTS, Axle/Drive/Half
Valves
Removal and Installation
PINION GEAR DEPTH VARIANCE
 |
|
|
|
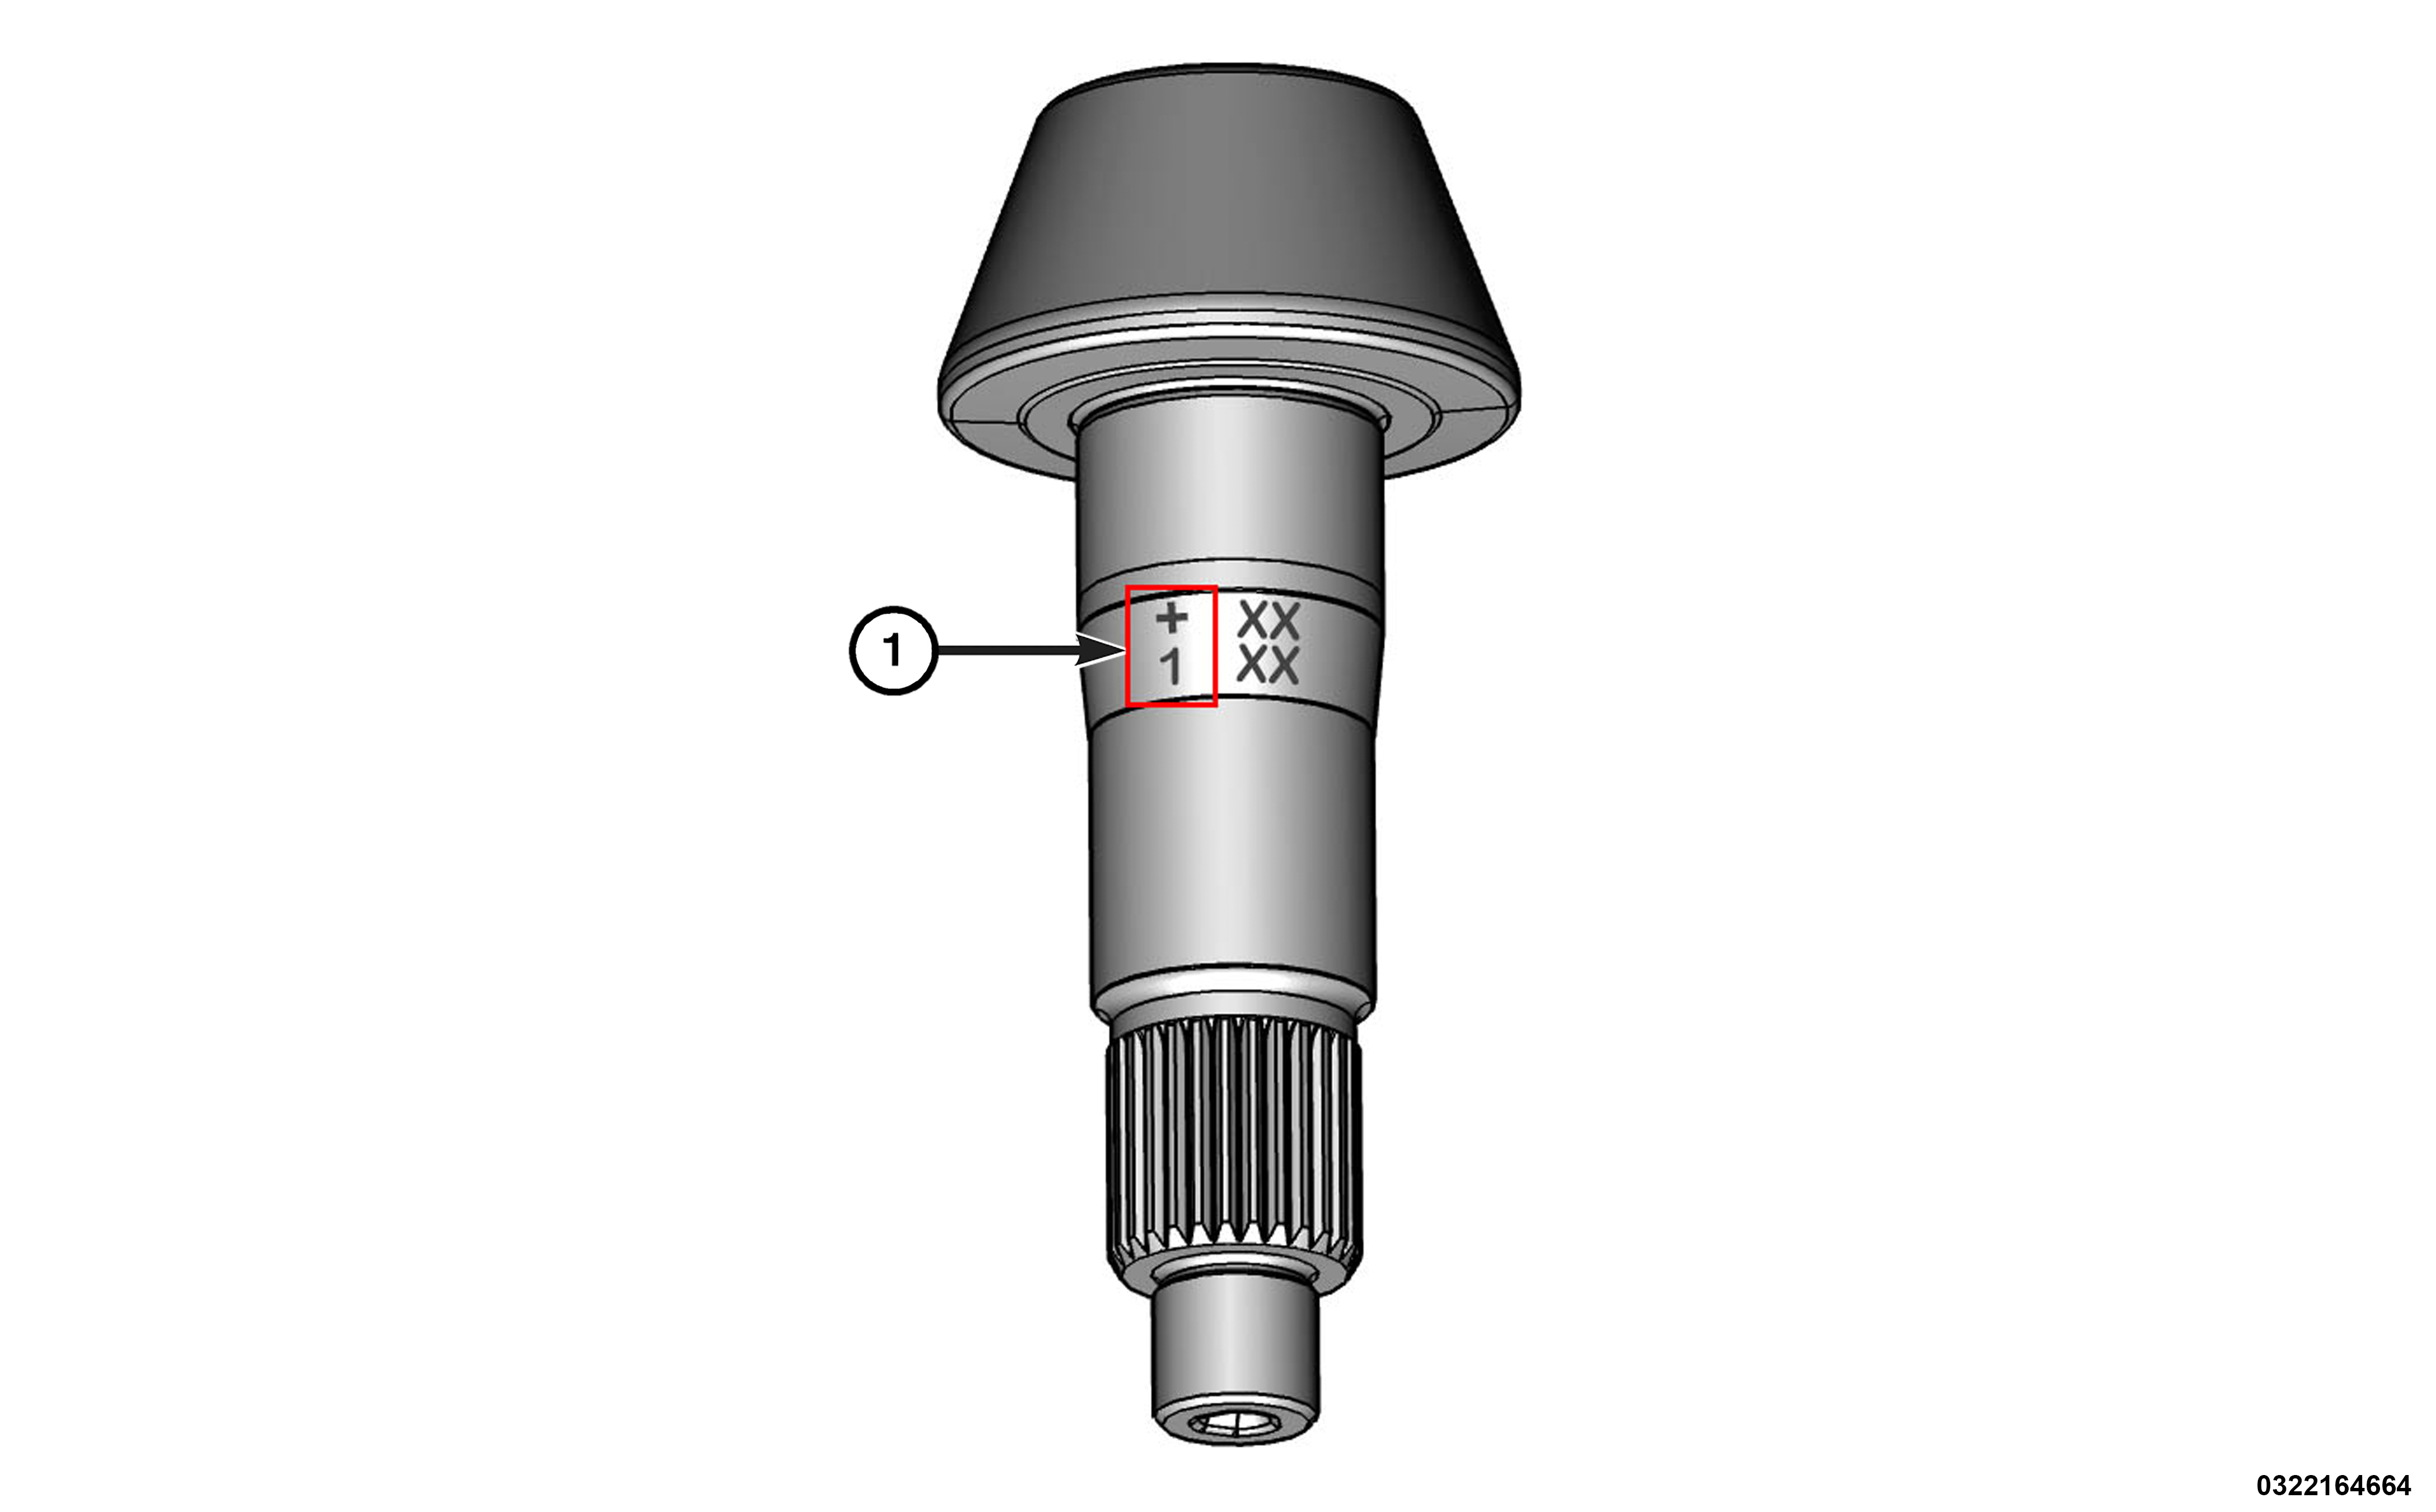
Ring and pinion gears are supplied as matched sets. A plus “+” number, minus “-” number or zero “0” is etched into the shank of the pinion shaft. This number is the amount (in hundredths of a millimeter) the depth varies from the standard depth setting of a pinion etched with a “0”. The standard depth provides the best gear tooth contact pattern. Refer to Backlash and Contact Pattern in this section for additional information.
If a new gear set is being installed, note the depth variance etched into both the original and replacement pinion. Add or subtract this number from the thickness of the original depth washer to compensate for the difference in the depth variances. Refer to the Depth Variance chart.
Note where Old and New Pinion Marking columns intersect. Intersecting figure represents plus or minus the amount needed.
Note the etched number on the face of the pinion shaft (-1, -2, 0, +1, +2, etc.). The numbers represent hundredths of a millimeter deviation from the standard. If the number is negative, add that value to the required thickness of the depth washer. If the number is positive, subtract that value from the thickness of the depth washer. If the number is 0 no change is necessary.
PINION GEAR DEPTH VARIANCE
|
Original Pinion Gear Depth Variance |
Replacement Pinion Gear Depth Variance |
|||||||||
|---|---|---|---|---|---|---|---|---|---|---|
|
−4 |
−3 |
−2 |
−1 |
0 |
+1 |
+2 |
+3 |
+4 |
||
|
+4 |
+0.20 |
+0.18 |
+0.15 |
+0.13 |
+0.10 |
+0.08 |
+0.05 |
+0.03 |
0 |
|
|
+3 |
+0.18 |
+0.15 |
+0.13 |
+0.10 |
+0.08 |
+0.05 |
+0.03 |
0 |
−0.03 |
|
|
+2 |
+0.15 |
+0.13 |
+0.10 |
+0.08 |
+0.05 |
+0.03 |
0 |
−0.03 |
−0.05 |
|
|
+1 |
+0.13 |
+0.10 |
+0.08 |
+0.05 |
+0.03 |
0 |
−0.03 |
−0.05 |
−0.08 |
|
|
0 |
+0.10 |
+0.08 |
+0.05 |
+0.03 |
0 |
−0.03 |
−0.05 |
−0.08 |
−0.10 |
|
|
−1 |
+0.08 |
+0.05 |
+0.03 |
0 |
−0.03 |
−0.05 |
−0.08 |
−0.10 |
−0.13 |
|
|
−2 |
+0.05 |
+0.03 |
0 |
−0.03 |
−0.05 |
−0.08 |
−0.10 |
−0.13 |
−0.15 |
|
|
−3 |
+0.03 |
0 |
−0.03 |
−0.05 |
−0.08 |
−0.10 |
−0.13 |
−0.15 |
−0.18 |
|
|
−4 |
0 |
−0.03 |
−0.05 |
−0.08 |
−0.10 |
−0.13 |
−0.15 |
−0.18 |
−0.20 |
|
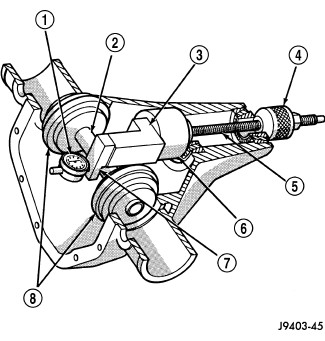
PINION DEPTH MEASUREMENT
 |
|
|
|
|
| 1 - Dial Indicator | 5 - Screw |
| 2 - Arbor | 6 - Pinion Height Gauge |
| 3 - Height Block | 7 - Scooter Block |
| 4 - Cone | 8 - Arbor Discs |
Measurements are taken with pinion bearing cups and pinion bearings installed in the housing. Take measurements with Pinion Gauge Set and Dial Indicator Set, Dial Indicator C-3339A .
- Assemble Pinion Height Block Block, Height 6739 , Pinion Block Pinion Head Bearing Remover Blocks 2076400030 and rear pinion bearing onto Screw Screw 6741 .
- Insert assembled pinion block, pinion height block, rear bearing and screw into the housing through pinion bearing cups.
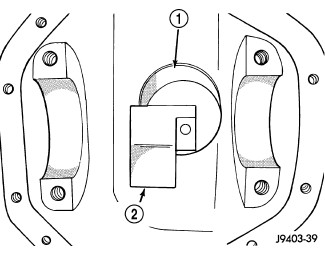
1 - Pinion Height Gauge 2 - Height Block - Install front pinion bearing and Cone-nut Cone 6740 onto the screw. Tighten cone-nut until Torque To Rotate the screw is 2.2 N·m (20 in. lbs.).
- Place Arbor Disc Set, Arbor Disc 2052800030 on Arbor Arbor D-115-3 in position in the housing side bearing cradles.
NOTE: Arbor Discs Set, Arbor Disc 2052800030 has different step diameters to fit other axles. Choose proper step for axle being serviced.
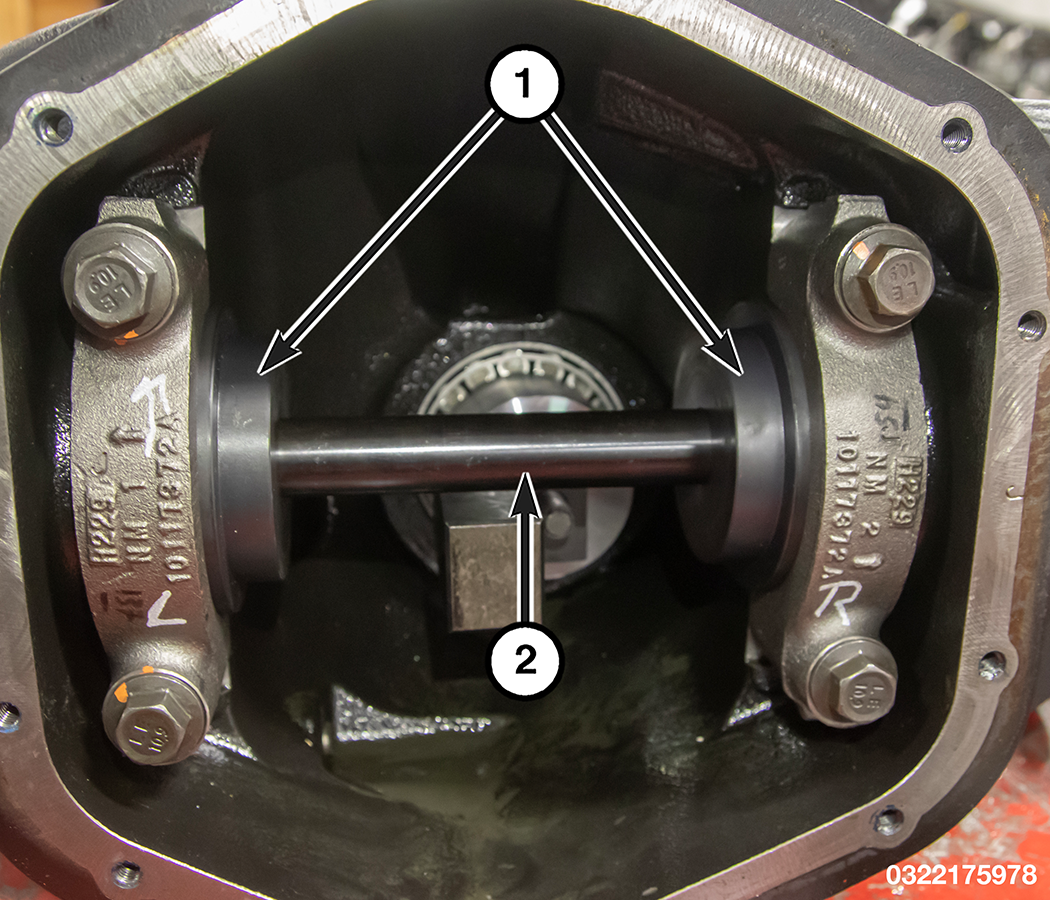
1 - Arbor Discs 2 - Arbor - Install differential bearing caps on arbor discs and snug the bearing cap bolts. Then cross tighten cap bolts to proper (Torque Specifications) .
- Assemble Dial Indicator Set, Dial Indicator C-3339A into Scooter Block Block, Scooter D-115-2A and secure set screw.
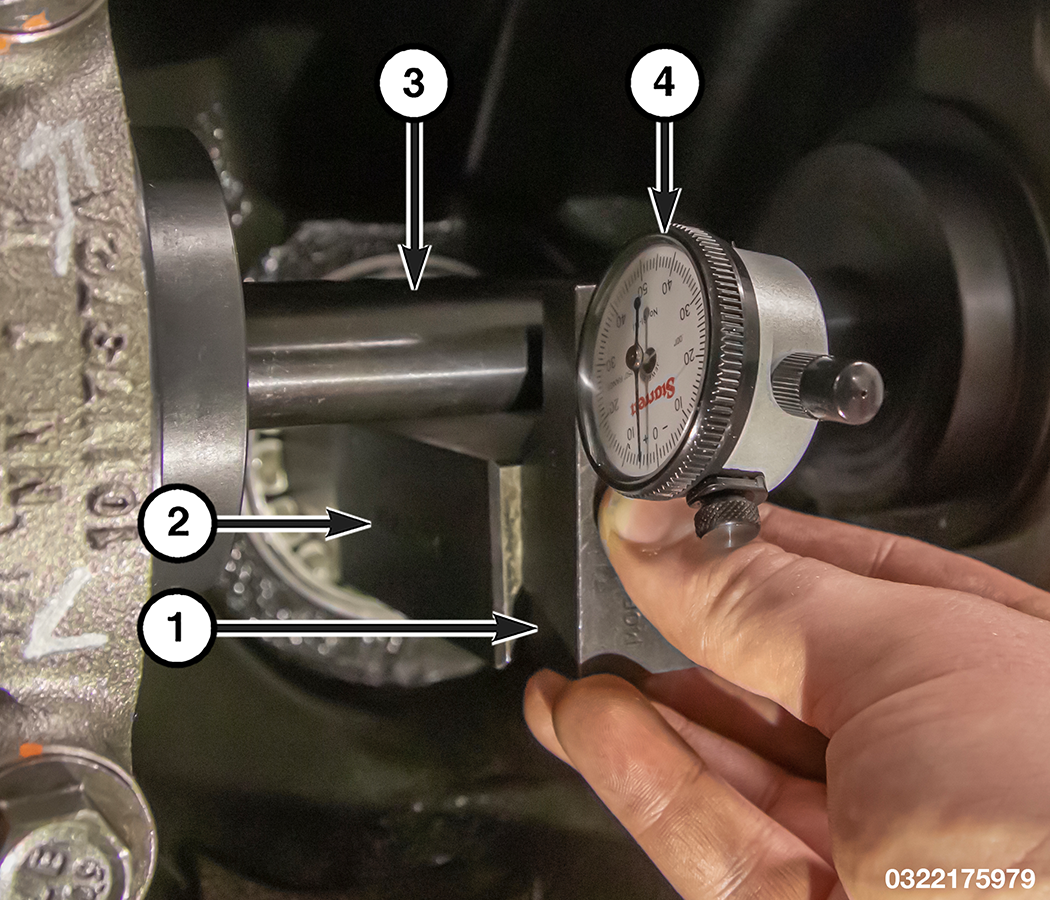
1 - Scooter Block 2 - Pinion Height Block 3 - Arbor 4 - Dial Indicator - Position Scooter Block/Dial Indicator flush on the pinion height block. Hold scooter block and zero the dial indicator.
- Slowly slide the scooter block across the pinion height block over to the arbor. Move the scooter block till dial indicator crests the arbor, then record the highest reading.
- Select a shim equal to the dial indicator reading plus or minus pinion depth variance number etched in the face of the pinion. For example, if the depth variance is -2, add 0.002 in. to the dial indicator reading. If the depth variance is +2, subtract 0.002 in. to the dial indicator reading.
DIFFERENTIAL SIDE BEARING PRELOAD AND RING GEAR BACKLASH
 |
|
|
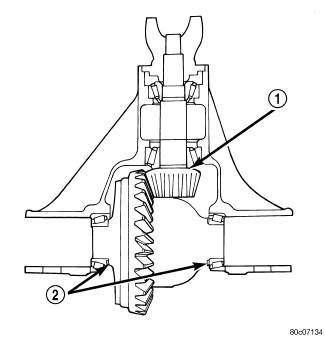
| 1 - Pinion Depth Shim |
| 2 - Differential Side Bearing Shims |
Before measuring differential bearing preload and gear backlash, measure pinion gear depth and prepare pinion for installation. Pinion gear depth is essential to establishing gear backlash and tooth contact patterns.
Differential side bearing preload and gear backlash is achieved by selective shims positioned behind the differential side bearing cones. The proper shim thickness can be determined using slip-fit Dummy Bearings Bearing, Dummy 96.838 mm 2053100030 in place of the differential side bearings and a Dial Indicator Set, Dial Indicator C-3339A . After measuring shim thickness to take up differential side play, install pinion and measure gear backlash shim thickness. Overall shim thickness is the dial indicator reading and preload specification added together. The gear backlash measurement determines the shim thickness used on the ring gear side of the differential case. Subtract gear backlash shim thickness from overall shim thickness to determine shim thickness for pinion gear side of the differential.
- Remove differential side bearings from differential case.
NOTE: It is difficult to salvage the differential side bearings during the removal procedure. Install new bearings if necessary.
- Remove factory installed shims from differential case.
- Install ring gear on differential case and tighten bolts to specification.
- Install dummy bearings Bearing, Dummy 96.838 mm 2053100030 on differential case.
- Install differential case in the housing.
- Install the marked bearing caps in their correct positions and snug the bolts.
- Seat the differential dummy bearing to the pinion side of the housing with a dead-blow hammer.
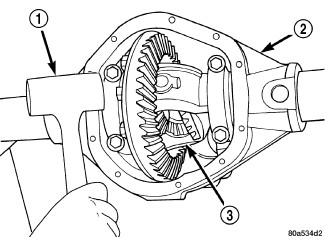
1 - Dead-Blow Hammer 2 - Housing 3 - Differential Case - Seat the differential dummy bearing to the ring gear side of the housing with a dead-blow hammer.
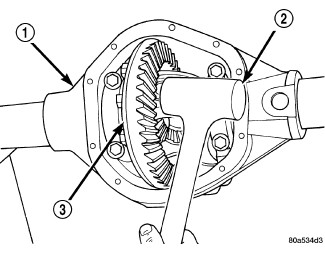
1 - Housing 2 - Dead-Blow Hammer 3 - Differential Case - Thread Pilot Stud Set, Alignment Pins C-3288-B into rear cover bolt hole below ring gear.
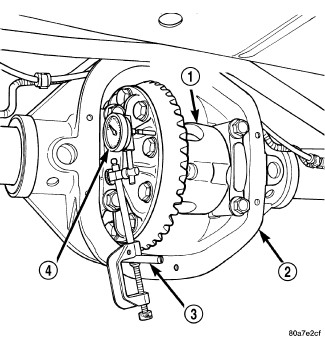
1 - Differential Case 2 - Housing 3 - Alignment Pin 4 - Dial Indicator - Attach the Dial Indicator Set, Dial Indicator C-3339A to pilot stud. Position the dial indicator plunger on a flat surface between the ring gear bolt heads.
- Push and hold differential case to pinion gear side of the housing and zero dial indicator.
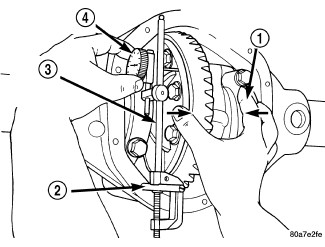
1 - Differential Case 2 - Dial Indicator Set 3 - Dial Indicator Set 4 - Dial Indicator - Push and hold differential case to ring gear side of the housing and record the dial indicator reading.
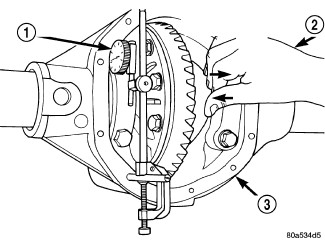
1 - Dial Indicator 2 - Push and Hold 3 - Housing - Add 0.38 mm (0.015 in.) to the recorded zero end play total. This total represents the thickness of shims needed to preload the new bearings when the differential is installed.
- Rotate dial indicator out of the way on the pilot stud.
- Remove differential case and dummy bearings from the housing.
- Install the pinion gear in the housing. Install the pinion yoke and establish Pinion Torque To Rotate.
- Install differential case and dummy bearings Bearing, Dummy 96.838 mm 2053100030 in the housing (without shims), install bearing caps and tighten bolts snug.
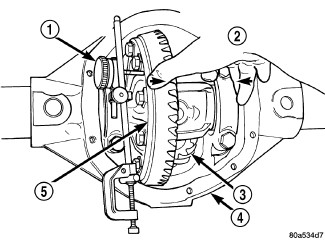
1 - Dial Indicator 2 - Push and Hold 3 - Pinion Gear 4 - Housing 5 - Differential Case - Seat ring gear side dummy bearing.
- Position the dial indicator plunger on a flat surface between the ring gear bolt heads.
- Push and hold differential case toward pinion gear and zero the dial indicator.
- Push and hold differential case to ring gear side of the housing and record dial indicator reading.
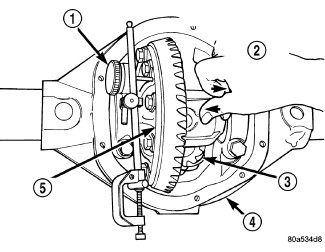
1 - Dial Indicator 2 - Push and Hold 3 - Pinion Gear 4 - Housing 5 - Differential Case - This is the shim thickness needed on the ring gear side of the differential case for proper backlash.
- Subtract the backlash shim thickness from the total preload shim thickness. The remainder is the shim thickness required on the pinion side of the housing.
- Rotate dial indicator out of the way on pilot stud.
- Remove differential case and dummy bearings from the housing.
- Install the selected side bearing shims onto the differential case hubs.
- Install side bearings on differential case hubs with install Installer, Ball Joint 6761 and a sufficient hydraulic press.
- Install bearing cups on differential.
- Install Spreader Spreader, Differential W-129-B and some items from Adapter Set Adapter Kit, Axle Spreader 6987B on the housing and spread open enough to receive differential case.
CAUTION: Never spread housing over 0.50 mm (0.020 in.). Failure to follow these instructions will damage the housing.
- Install differential case into the housing.
- Remove spreader from the housing.
- Rotate the differential case several times to seat the side bearings.
- Position the indicator plunger against a ring gear tooth.
- Push and hold ring gear upward while not allowing the pinion gear to rotate.
- Zero dial indicator face to pointer.
- Push and hold ring gear downward while not allowing the pinion gear to rotate. Dial indicator reading should be between 0.12 mm (0.005 in.) and 0.20 mm (0.008 in.). If backlash is not within specifications transfer the necessary amount of shim thickness from one side of the housing to the other.
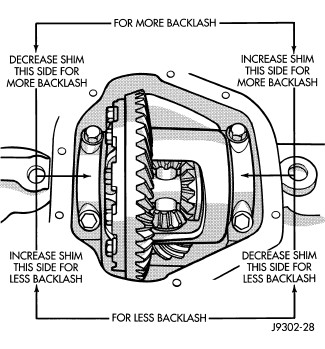
- Verify differential case and ring gear runout by measuring ring to pinion gear backlash at eight locations around the ring gear. Readings should not vary more than 0.05 mm (0.002 in.). If readings vary more than specified, the ring gear or the differential case is defective.
- Check the gear contact pattern.
GEAR CONTACT PATTERN
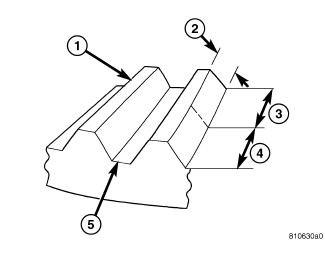 |
|
|
| 1 - Top Land |
| 2 - Profile |
| 3 - Toe |
| 4 - Heel |
| 5 - Root |
The ring gear and pinion teeth contact patterns will show if the pinion depth is correct in the axle housing. It will also show if the ring gear backlash has been adjusted correctly. The backlash can be adjusted within specifications to achieve desired tooth contact patterns.
The TOP LAND of the gear tooth is the top surface of the tooth. The PROFILE of the gear tooth is the depth of the tooth. The TOE of the gear is the portion of the tooth surface at the end towards the center. The HEEL of the gear is the portion of the tooth at the outer-end. The ROOT of the gear tooth is the lowest portion of the tooth .
| NOTE: |
If the PROFILE across the gear tooth is the same it is a 3 Axis cut gear. If the PROFILE across the gear tooth is tapered it is a 2 Axis cut gear. |
- Apply a thin coat of hydrated ferric oxide or equivalent, to the drive and coast side of the ring gear teeth.
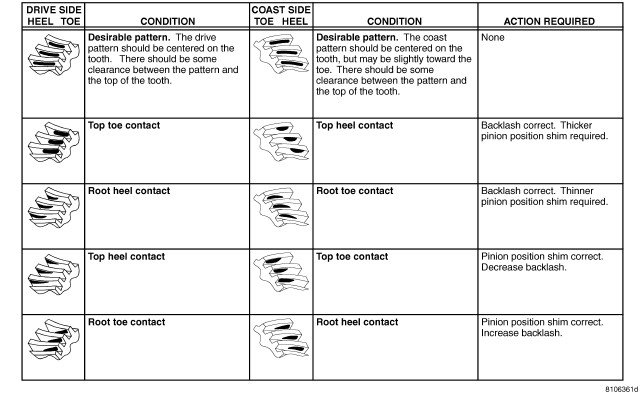
- Wrap, twist and hold a shop towel around the pinion yoke to increase the turning resistance of the pinion. This will provide a more distinct contact pattern.
- Using a boxed end wrench on a ring gear bolt, Rotate the differential case one complete revolution in both directions while a load is being applied from shop towel.
- The areas on the ring gear teeth with the greatest degree of contact against the pinion teeth will squeegee the compound to the areas with the least amount of contact. Note and compare patterns on the ring gear teeth to Gear Tooth Contact Patterns chart and adjust pinion depth and gear backlash as necessary.
- Perform the differential bearing preload check procedure.
DIFFERENTIAL BEARING PRELOAD CHECK
With an inch pound torque wrench measure Total Torque To Rotate (TTTR). This is the final check on the differential assembly before installing the axle shafts. This will verify the correct differential bearing preload.
| NOTE: |
To calculate TTTR: Measure the Pinion Torque To Rotate torque and add 0.45 to 0.95 N·m (4 to 8.5 in. lbs.). |
| NOTE: |
If TTTR is high, decrease the shim thickness equally on both sides of the differential and check TTTR again. If TTTR is low, increase the shims thickness equally on both sides of the differential and check TTTR again. |